
Fantastic Creations: House of Brass: General Information
Fantastic Creations: House of Brass Walkthrough contains step-by-step instructions for the entire game, including screenshots of all hidden object areas/items and puzzle solutions. There are also many video solutions. Can you escape the clockwork mansion before it's too late?
Images © Gi
Overview:
You mother has passed away and you recount your memories of an odd
fairy tale she used to tell you. When you find a brass tube in her
things, you open and it and a mechanical firefly takes you to
that
very fairy tale. Now, you're trapped! Can you escape... in time?
Hints: These are unlimited, but must refill.
The House
Hints: These are unlimited, but must refill.
The House
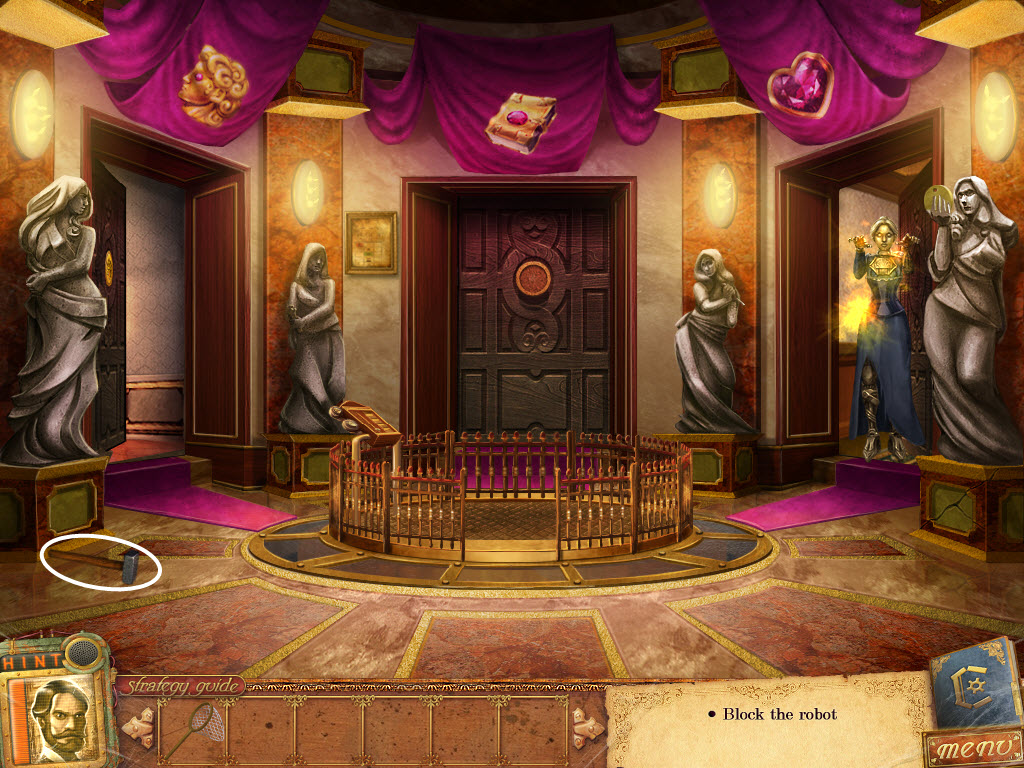
- input the code from the letter into the door
- pick up the Transmitter
- go forward
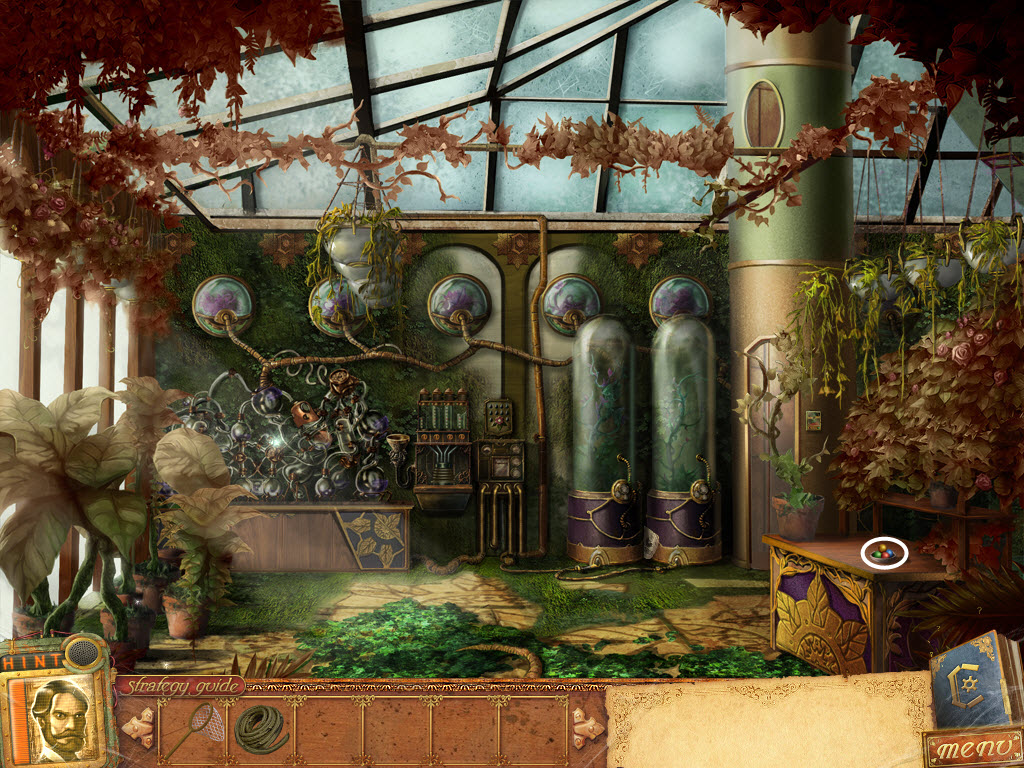
- take the Butterfly Net from the robot
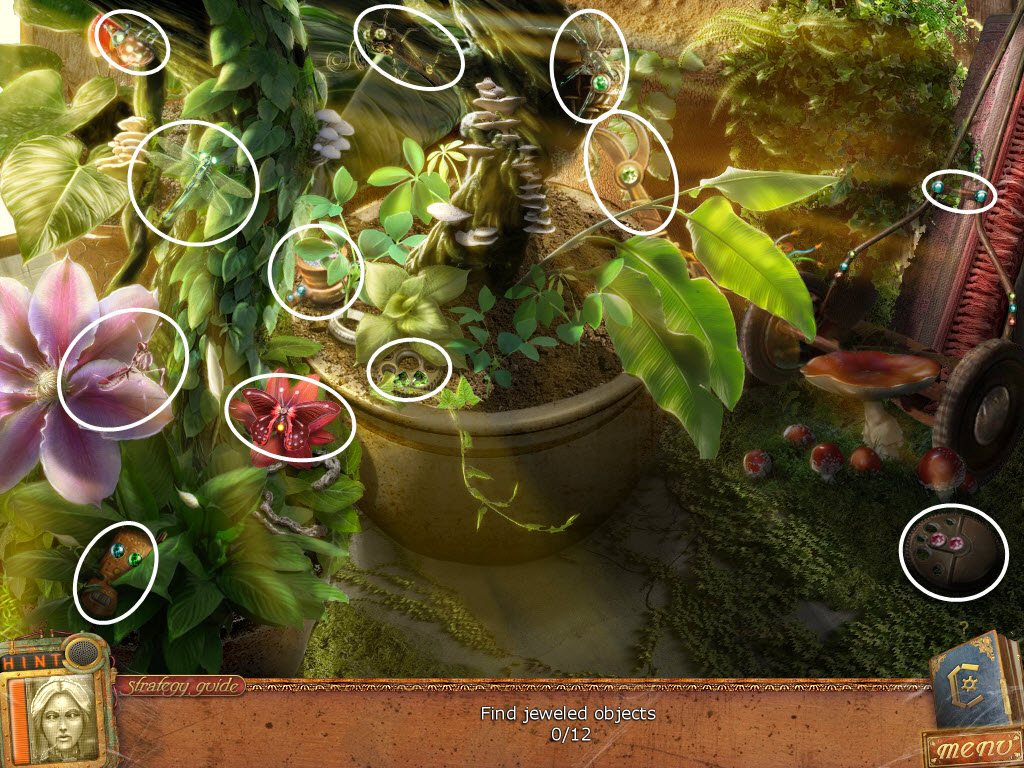
- use the Butterfly Net to catch the Fireflies
- go down
- use the Butterfly Net to catch the Fireflies
- place the Fireflies into the empty glass dome
- pick up the Journal Entry
- pick up the Battery

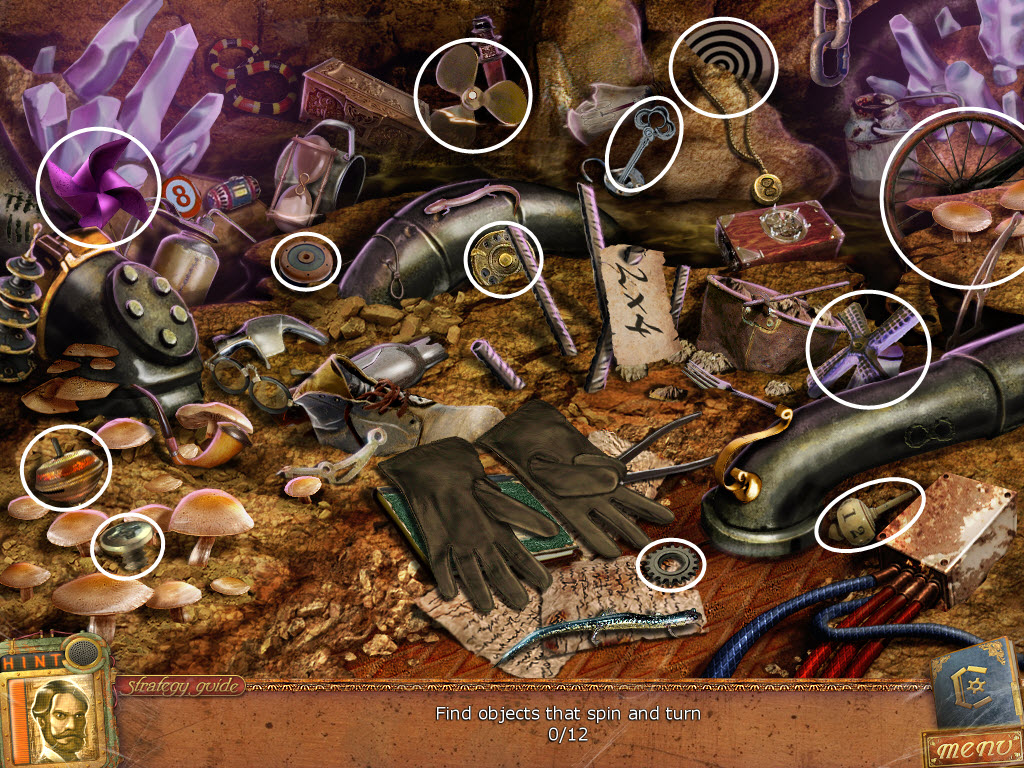
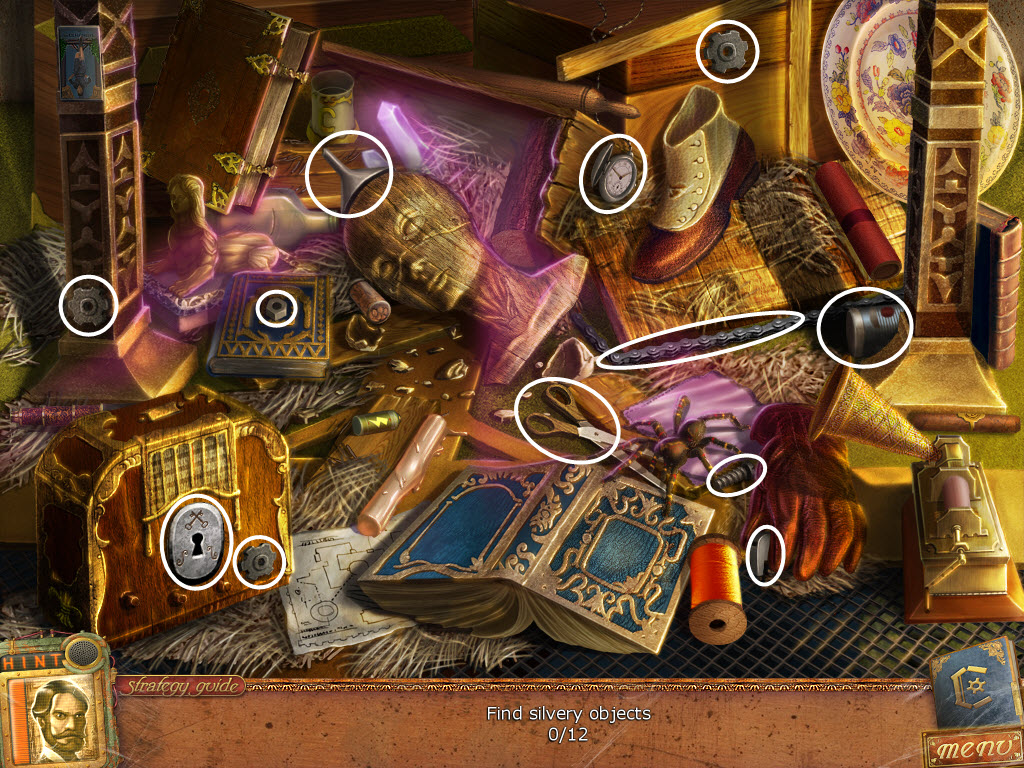
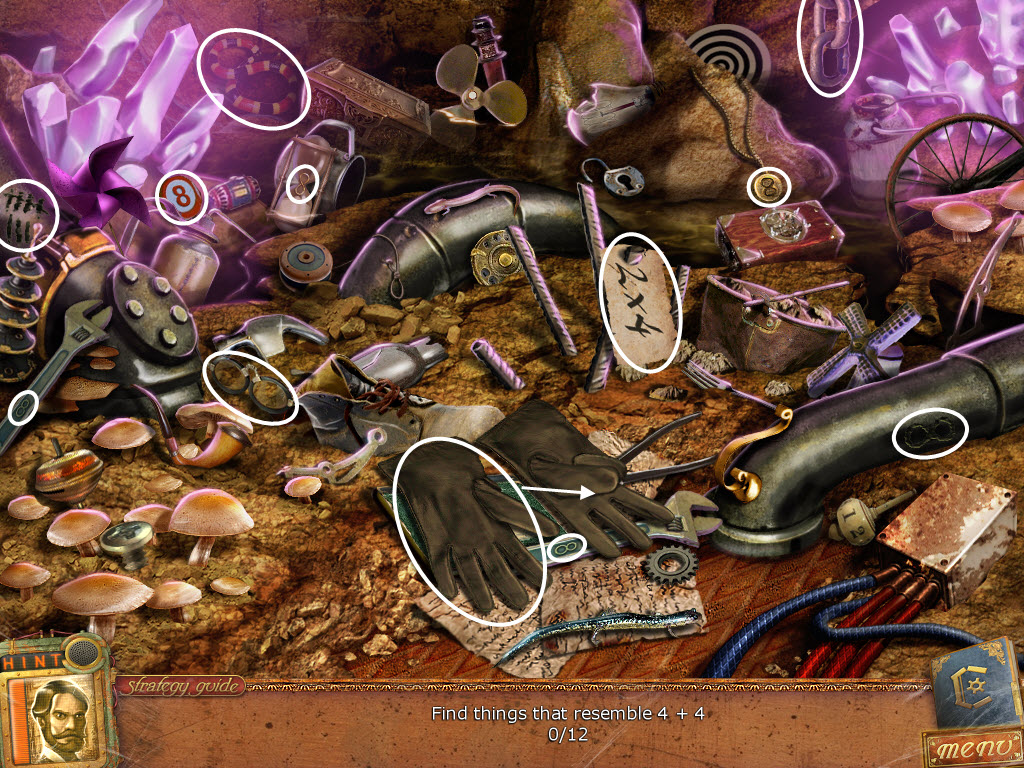
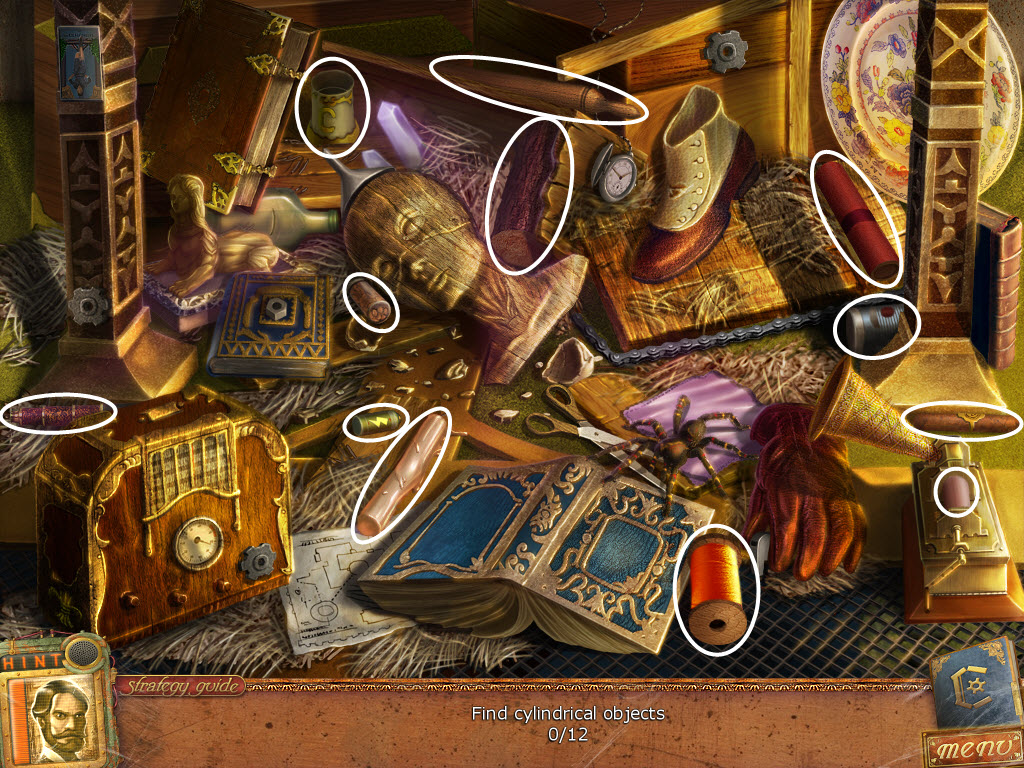
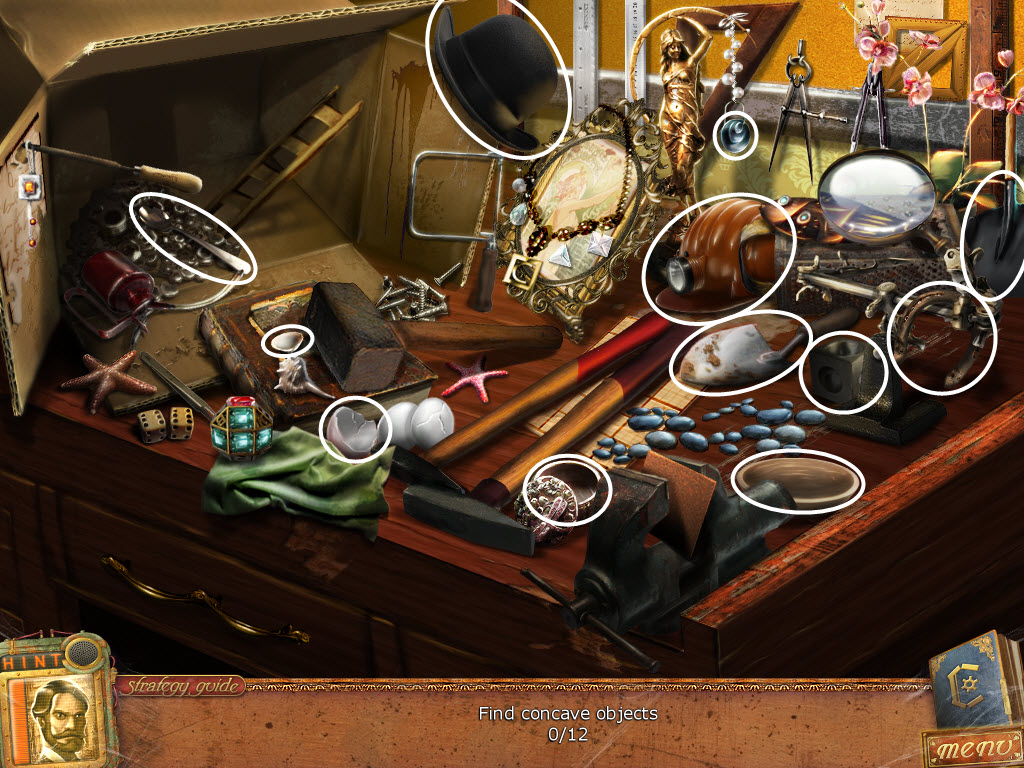
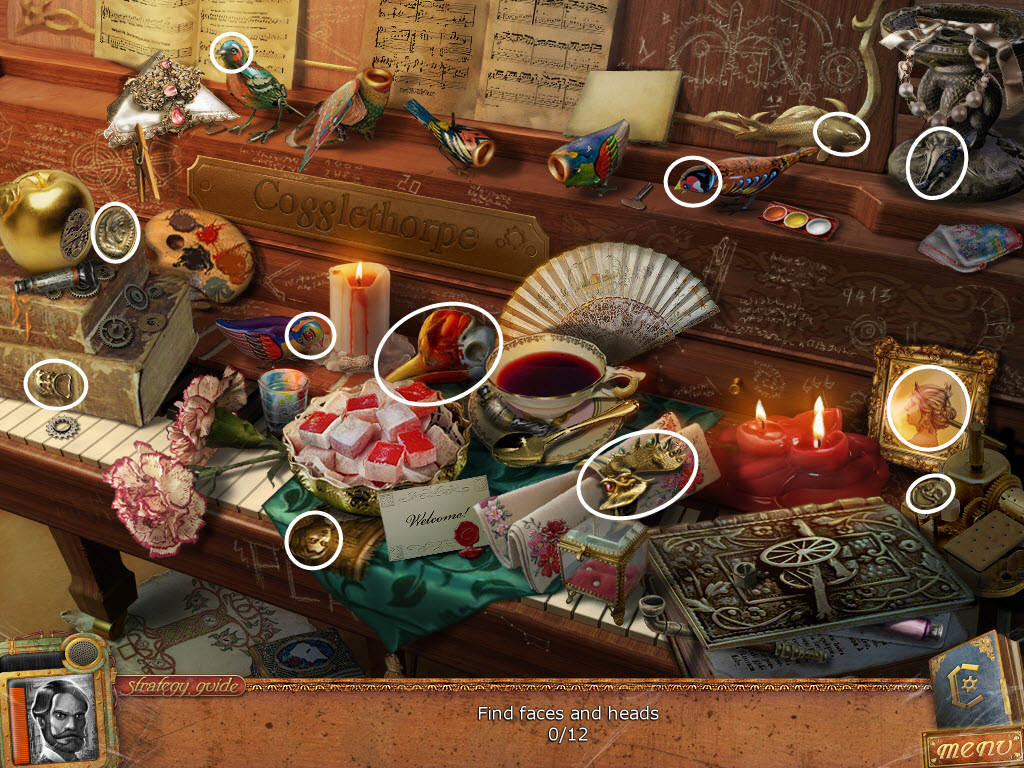
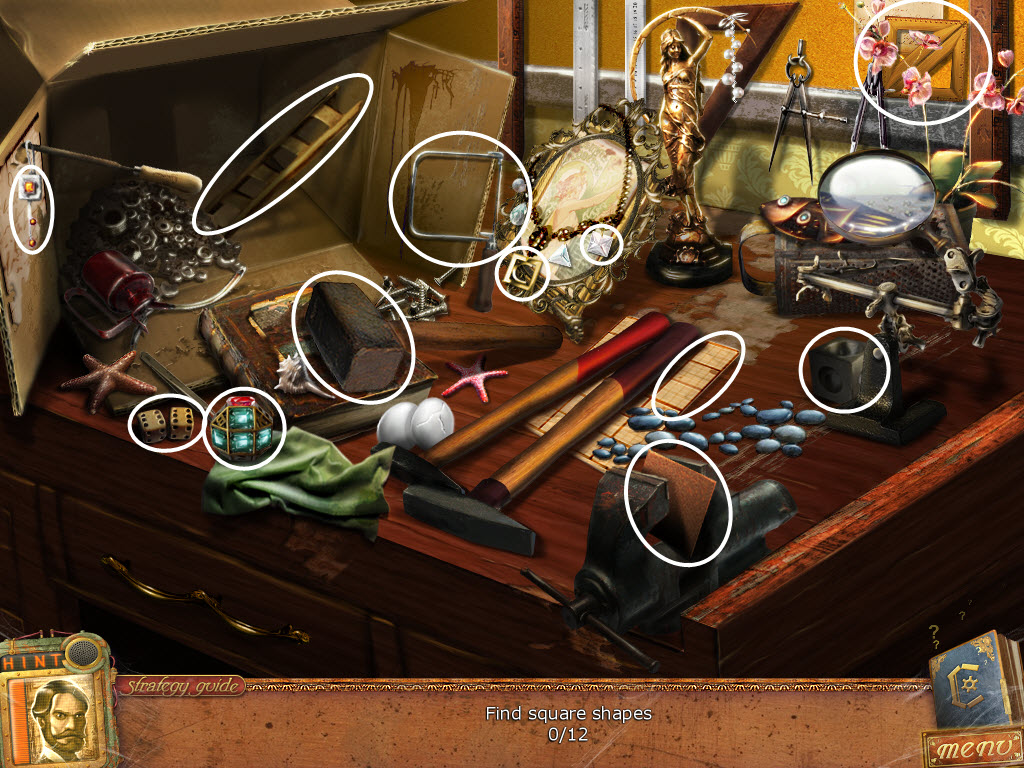
- click the sparkles - hidden object scene
- find the Small Key
- go forward
- take the Awning Crank
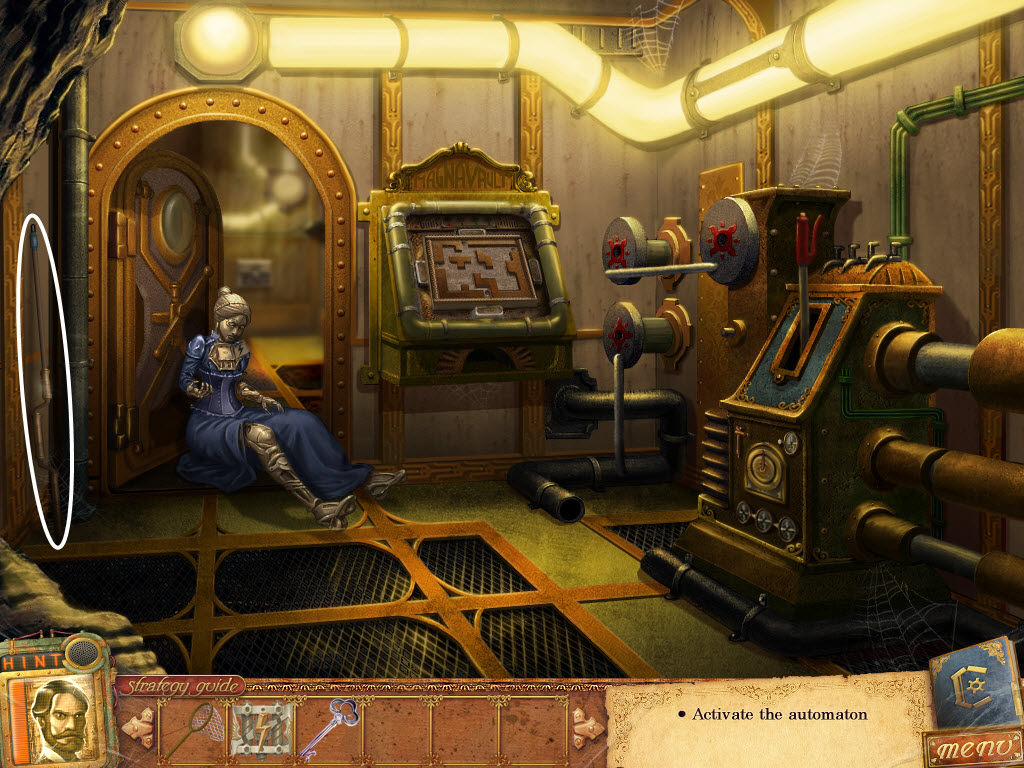
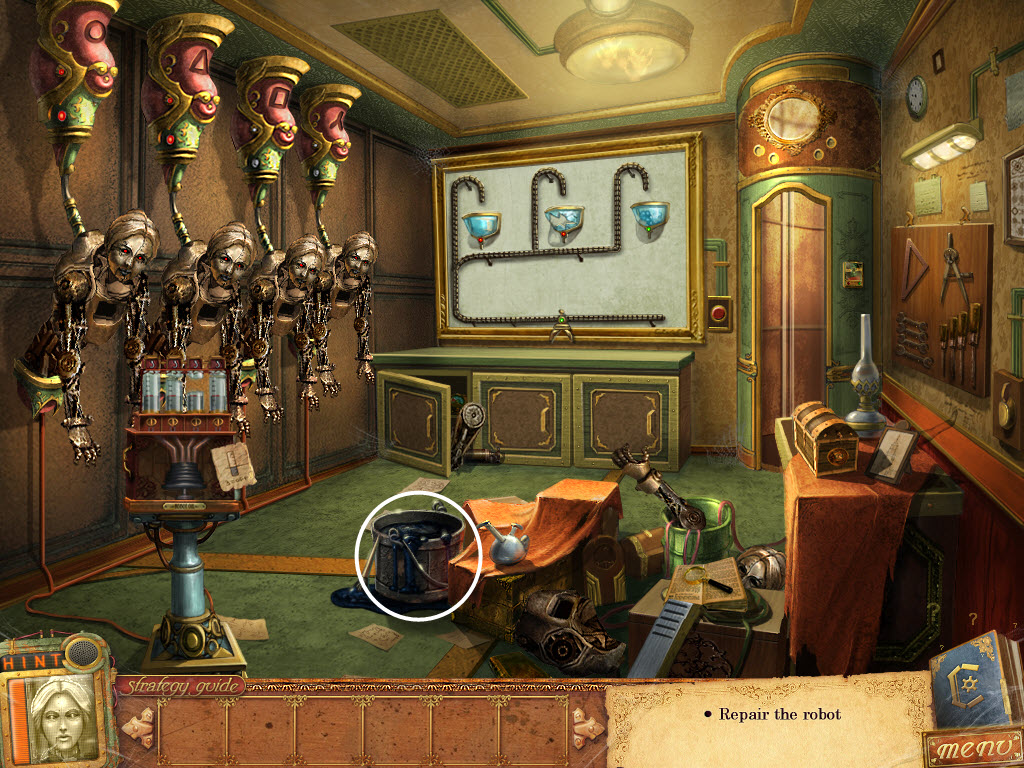
- examine the robot
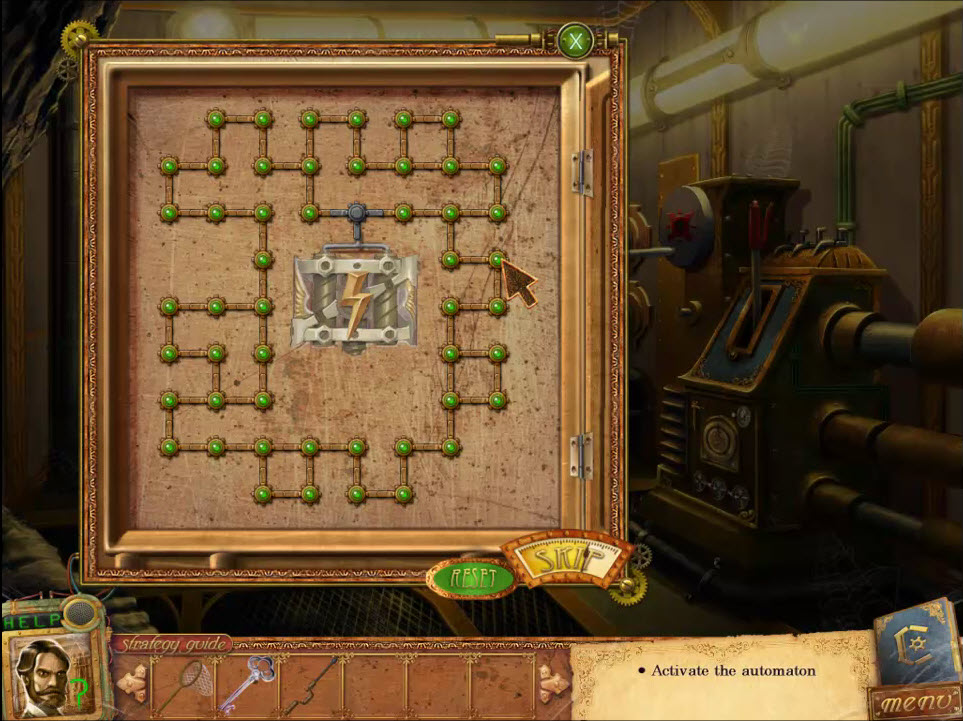
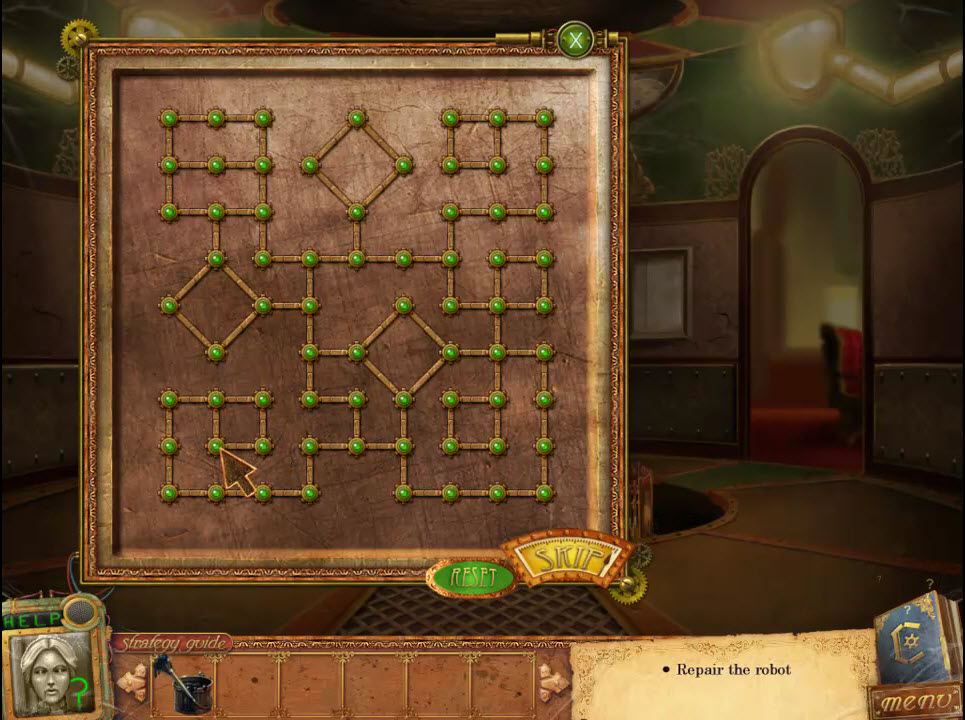
- Robot Puzzle
- replace the Battery
- rotate the pieces so they are all connect to each other and the battery
- see screenshot for solution
- go forward
- pick up the Journal Entry
- take the Pipe
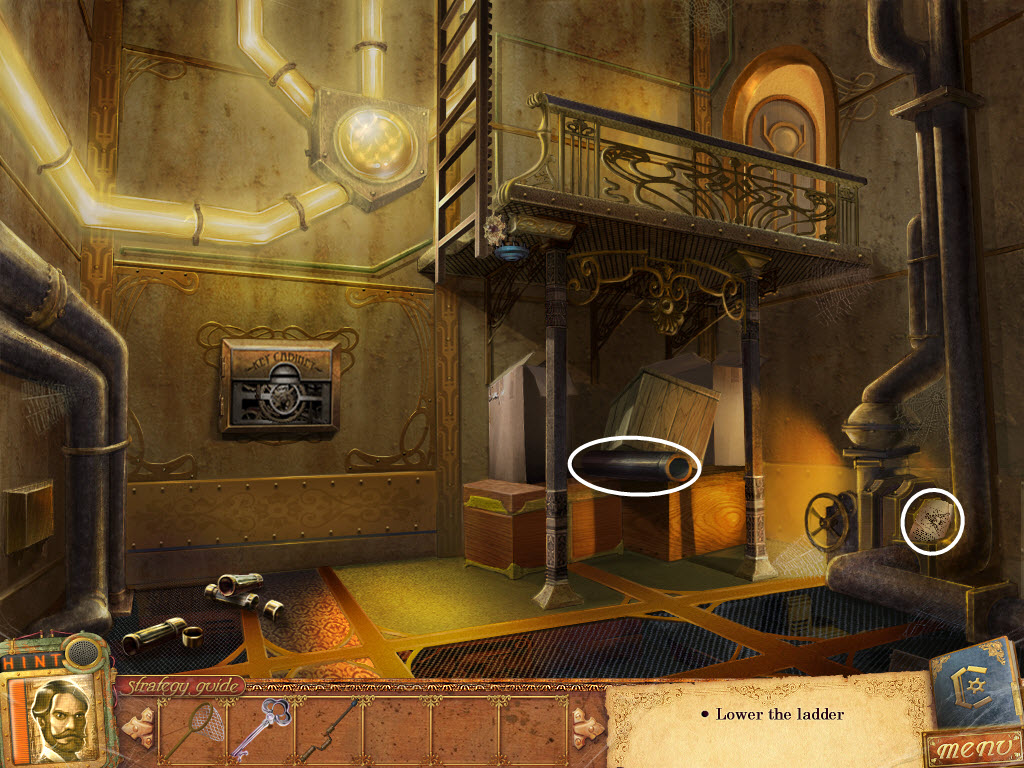
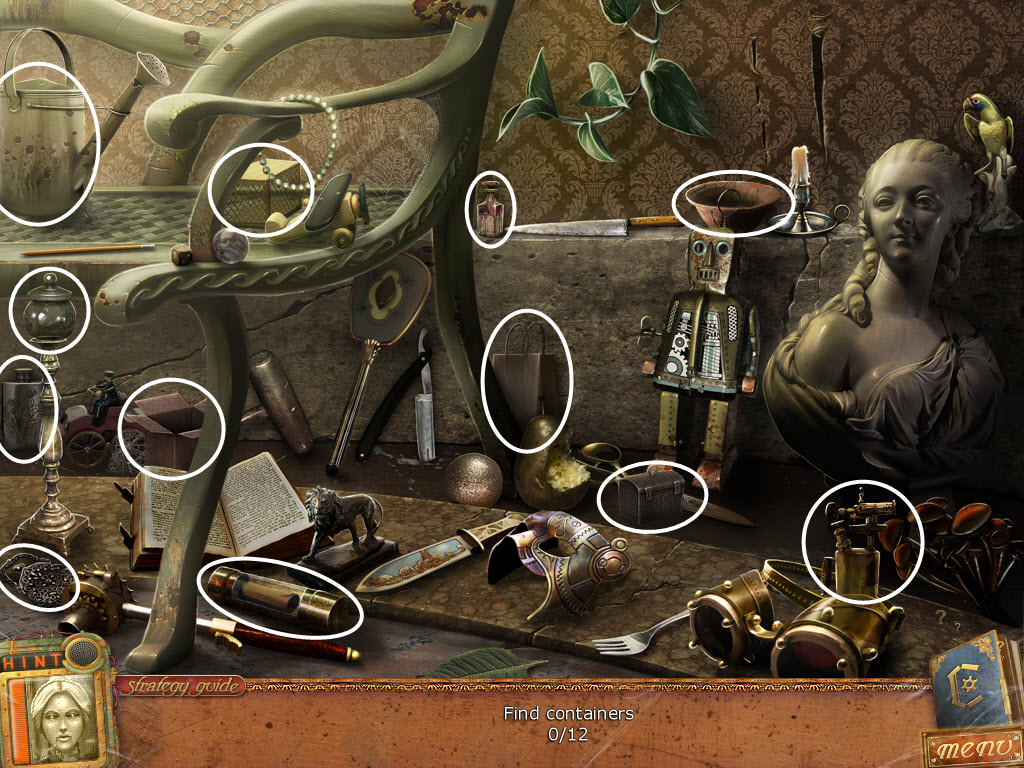
- click the sparkles - hidden object scene
- find the Keyhole
- use the Awning Crank to lower the ladder
- to right
- examine the left picture (house blueprint) and take the Cabinet Base
- enter the elevation platform
- take the Journal Entry
- pick up the Firefly Head
- return to the storage room
- examine the key cabinet on the wall
- replace the Cabinet Base and Keyhole
- use the Small Key in the Keyhole
- take the Valve and the Workshop Key
- go right
- examine the right door
- use the Workshop Key on the door
- enter the workshop
- pick up the Machine Wheel
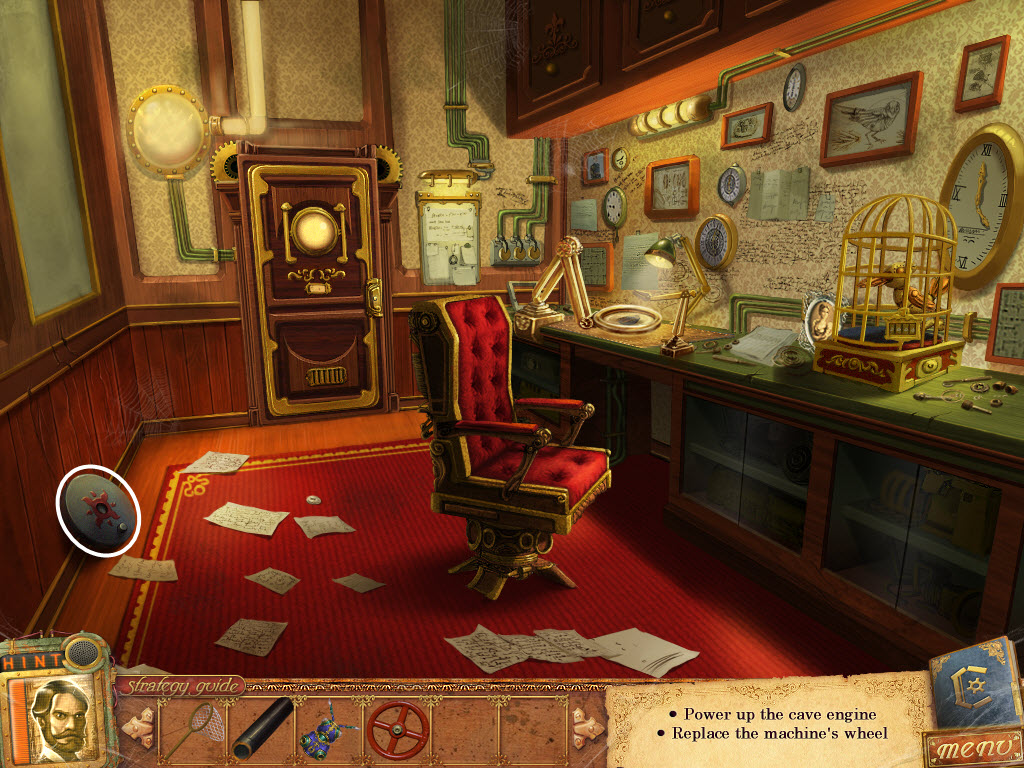
- return to the machine room
- replace the Pipe at the bottom of the machine
- replace the Machine Wheel
- reattach the small pipe to the Machine Wheel
- pull the lever
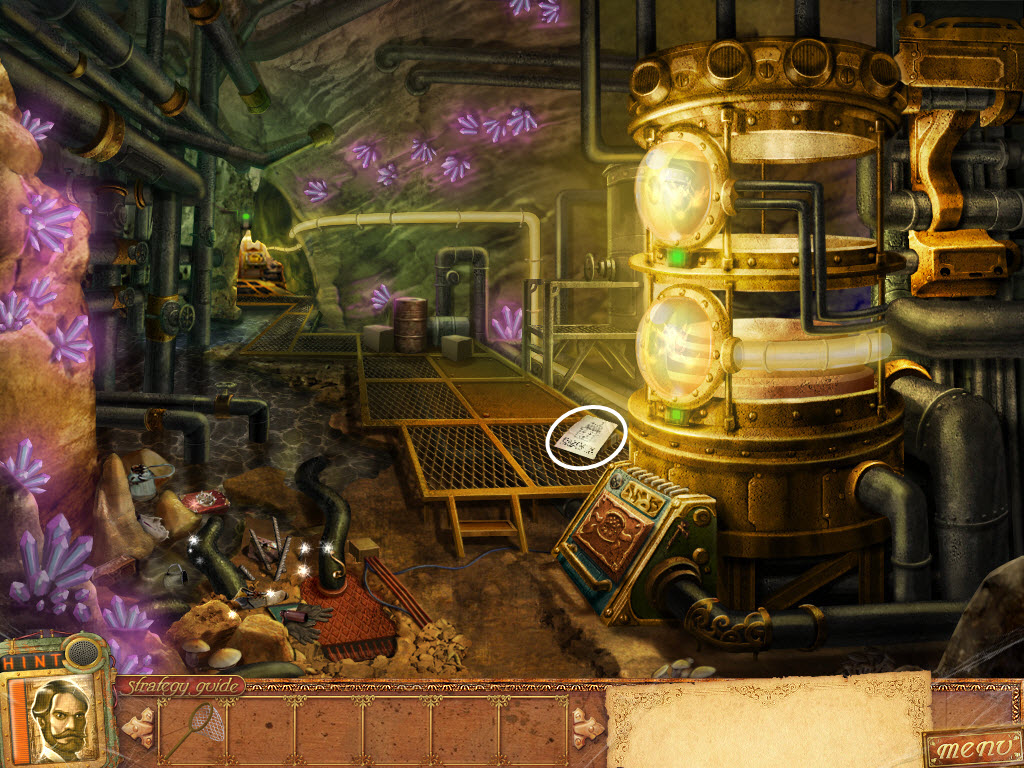
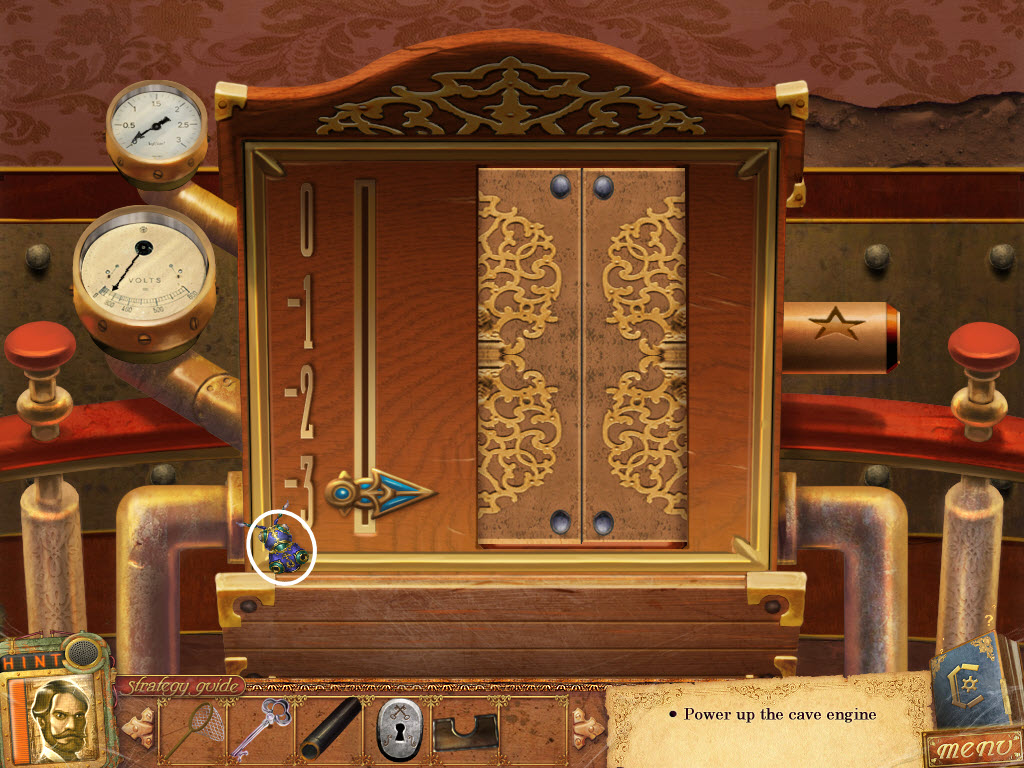
- return to the cave engine
- click the sparkles - hidden object scene
- find the Hourglass
- examine the steam pressure panel
- Steam Panel Puzzle
- replace the Valve
- rotate the pipes so they are all connected
- see screenshot for solution
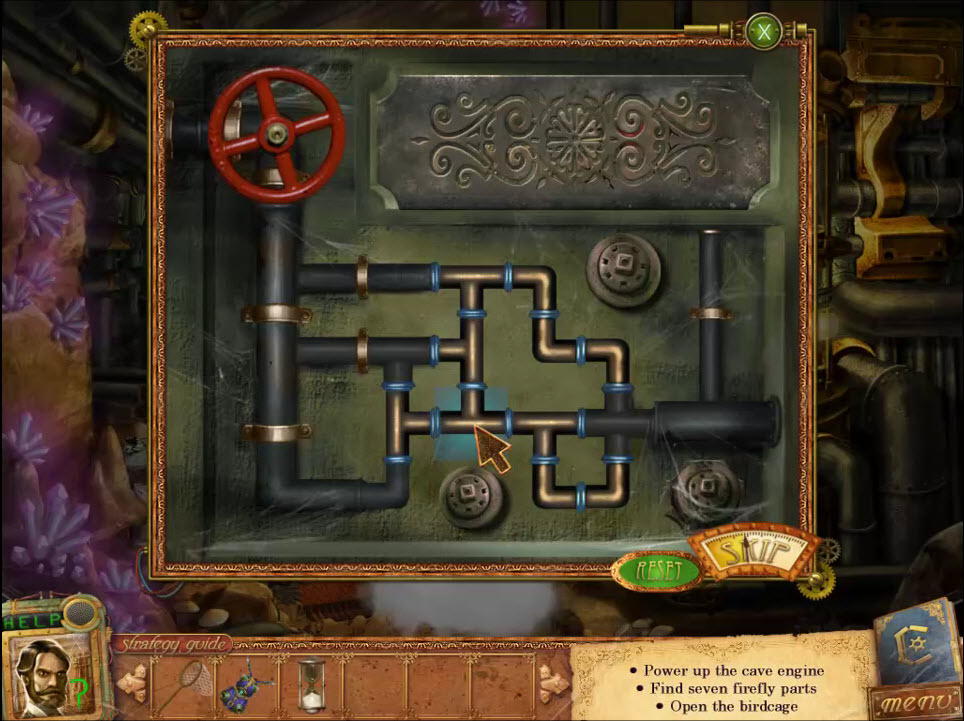
- take Star Shaped Lever
- return to the clockwork floor
- place the Hourglass into the hourglass shape next to the workshop
- take the Record and Elevator Button Half
- enter the elevator platform
- use the Star Shaped Lever in the star
- take the Door Handle
- return to the workroom
- examine the door
- use the Door Handle on the door
- enter the room
- examine the robot oil machine
- Robot Oil Puzzle
- turn the dials on/off to move the oil from one vial to another
- get all the oil to level 3
- see video for solution
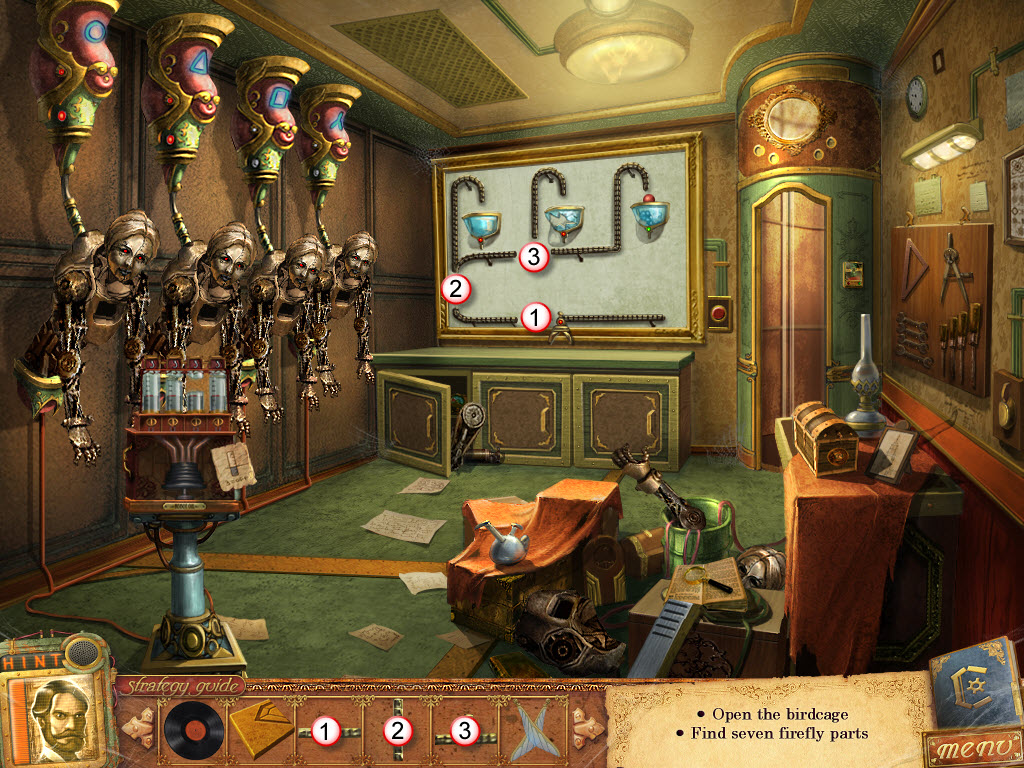
- make a note of the symbols above the robots
- pick up the Journal Entry
- pick up the three Track Parts
- pick up the Firefly
Wings
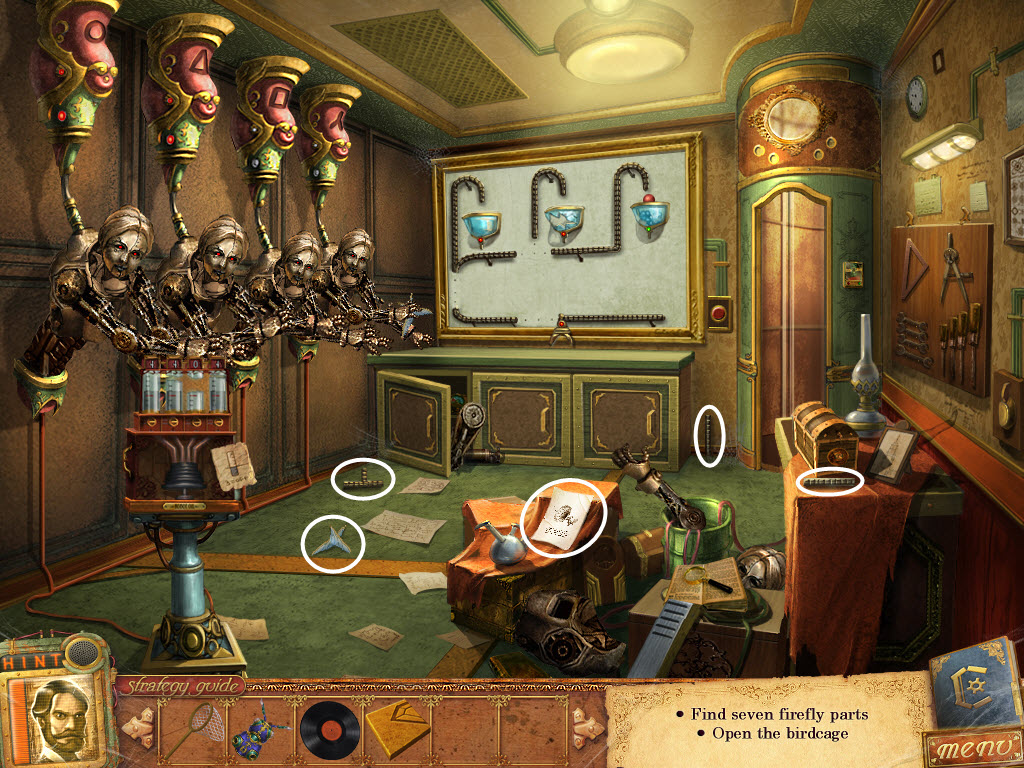
- replace the Track Parts on the board
- take the Red Sphere
- return to the storage room
- click the sparkles - hidden object scene
- find the Small Battery
- return to the machine room
- examine the magnavault
- Magnavault Puzzle
- replace the Red Sphere
- the object is to get all four colored balls matched with their color on the board
- use the magnets on all four sides to turn the board
- see video for solution
- take the Elevator Button Half
- return to the elevator platform
- place the Elevator Button Halves by the "2"
- press the diamond button
- use the Butterfly Net to catch the Fireflies
- pick up the Journal Entry
- go through the left door
- examine the first "I" clockwork theater
- Clockwork Theater I Puzzle
- press the buttons in the correct order so the rose is given to Gwen
- see screenshot for solution
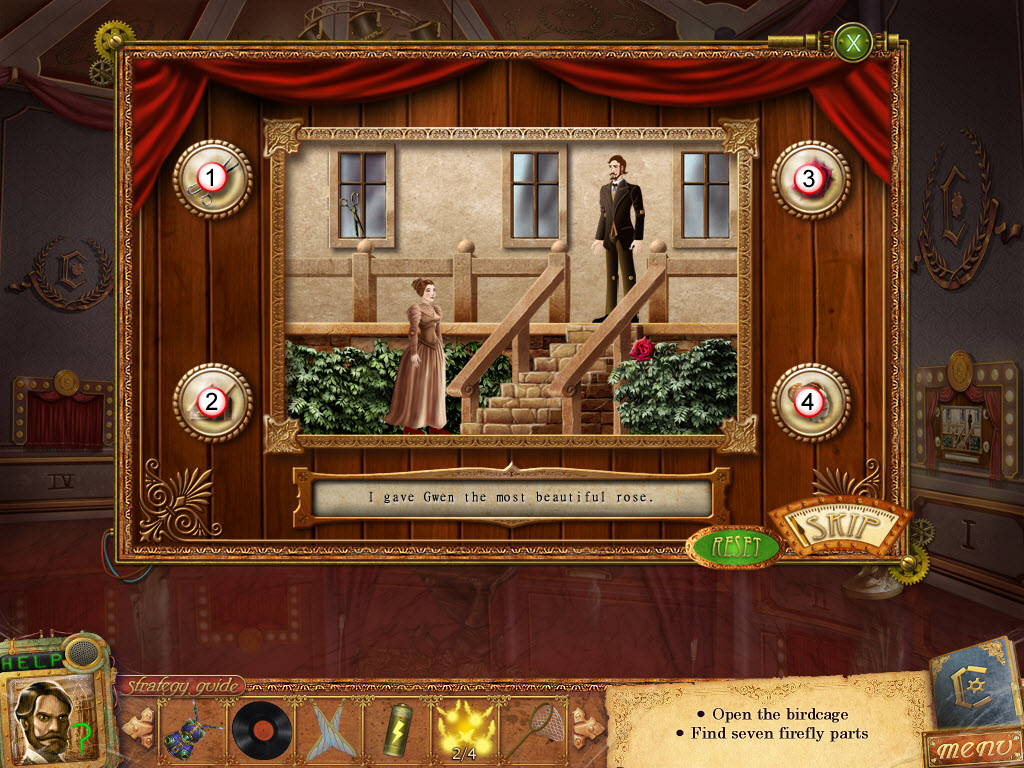
- receive a Small Light Bulb
- pick up the Journal Entry
- return to the workshop
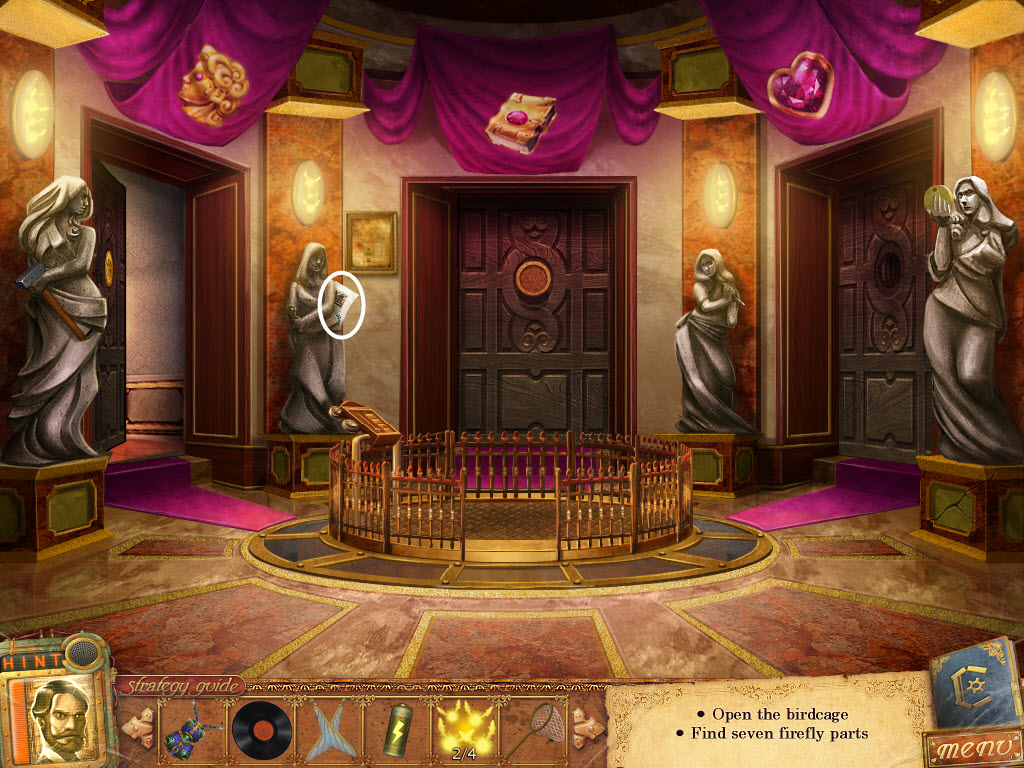
- examine the birdcage
- input the code from above the robots - it is also in your journal
- take the Firefly Body and Leg Set
- place the Record inside the cage
- take the Firefly Leg Set
- examine the workshop bench
- Firefly Puzzle
- place all the Firefly Parts on the blueprint
- assemble the firefly in order according to the blueprint - note the order is numbered, I, II, III, etc.
- chase the firefly (luxury floor)
- use the Butterfly Net to catch the Fireflies
- place the Fireflies in the chandelier
- return to the luxury floor
- pick up the Hammer
- use the Hammer on the base of the right statue
- take the Study Key
- use the Study Key on the middle door
- enter the study
- click the sparkles - hidden object scene
- find the Screwdriver
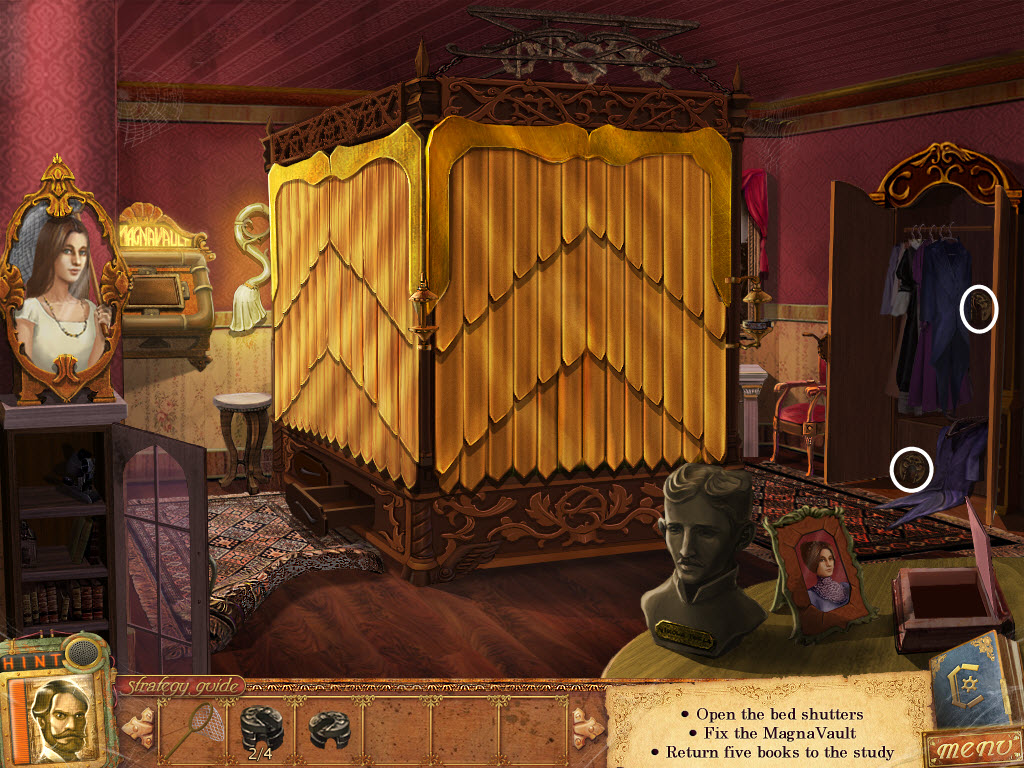
- open the doors on the bookshelf
- take the Wardrobe Key
- examine the door
- use the Screwdriver to remove the screws
- Study Door Puzzle
- rotate the rings so the pins can reach the center
- some rings will rotate other rings with it
- see video for solution
- enter the bedroom
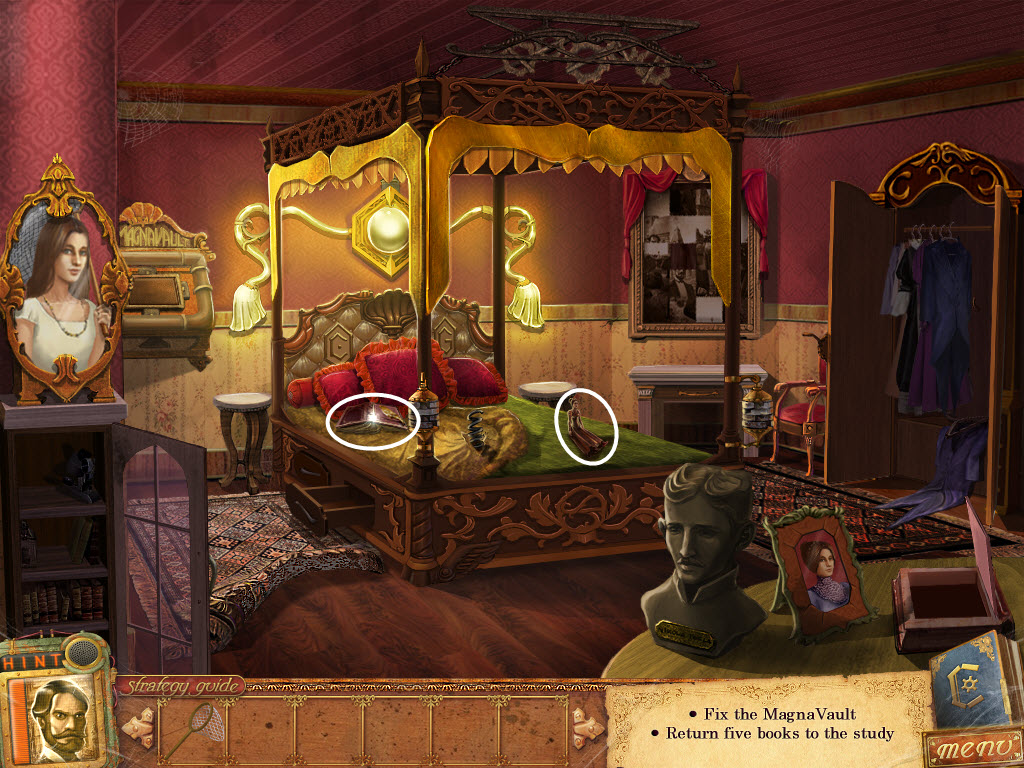
- open the glass door - under the picture
- take the Journal Entry and Right Weight
- open the red box on the table and take the Right Weight
- open the drawer beneath the bed and take the Right Weight
- pull back the rug by the bed and take the Left Weight
- take the Left Weight off the top of the bed
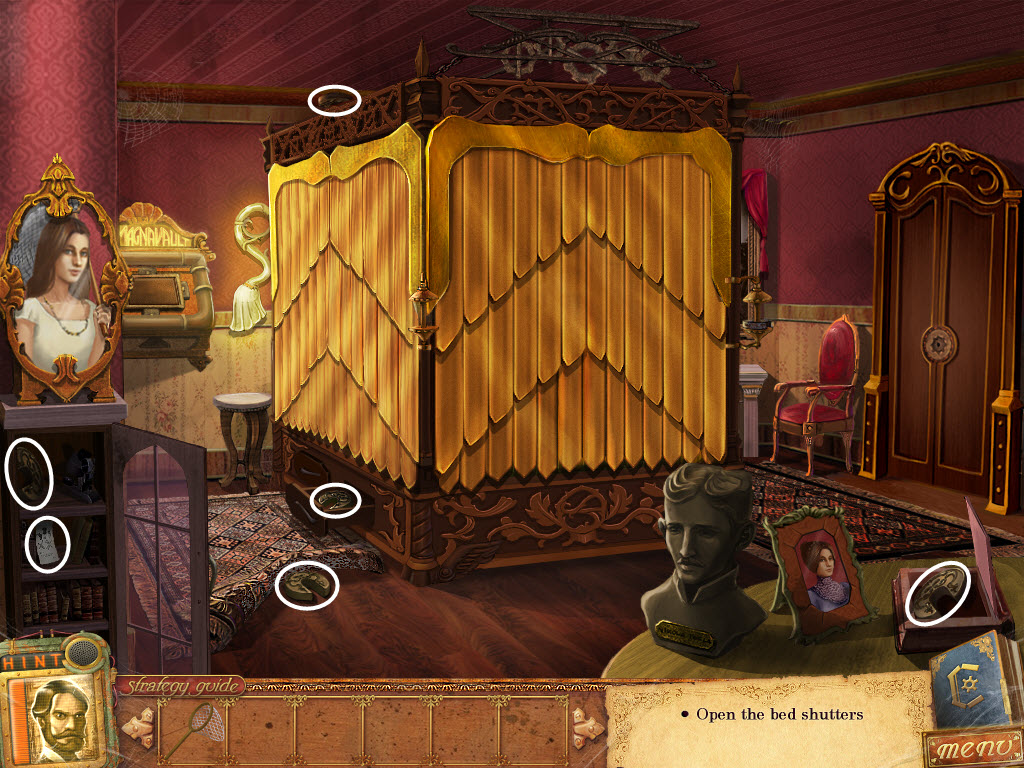
- use the Wardrobe Key on the door
- pull back the coat and take the Left Weight
- pick up the Left Weight on the wardrobe floor
- place the Right Weights on the right scale - on the bed posts
- place the Left Weights on the left scale - on the bed posts
- take the Theater Doll and Bird Book
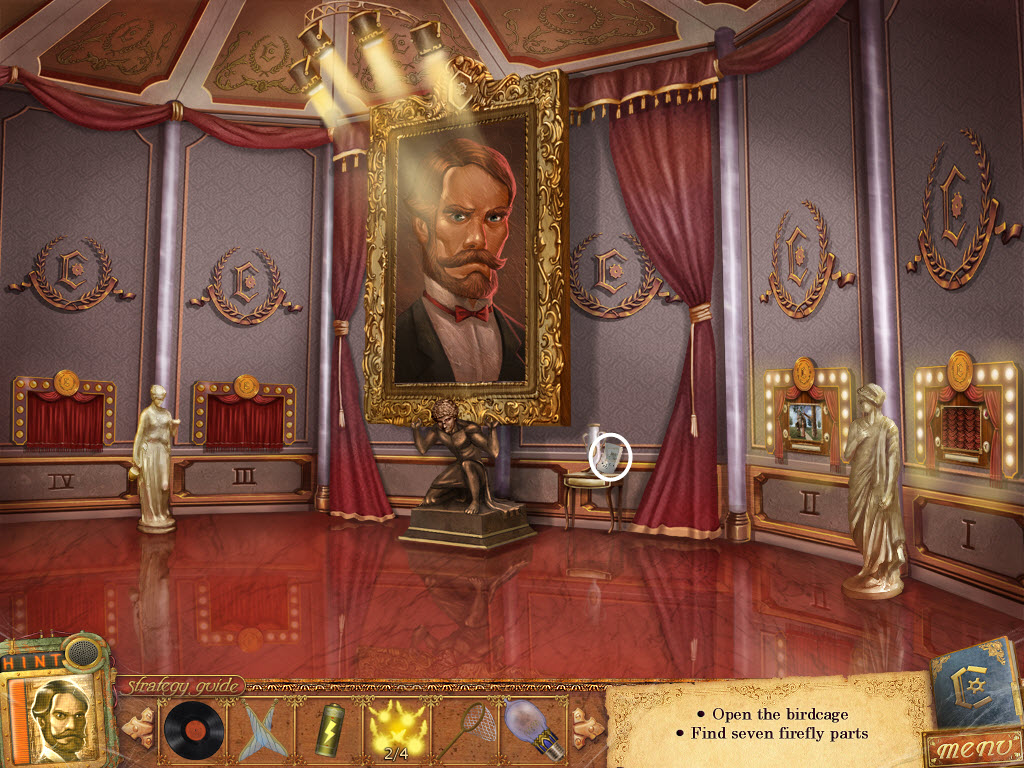
- return to the gallery
- examine clockwork theater II
- Clockwork Theater II Puzzle
- replace the Theater Doll
- press the buttons in the correct order to take a picture
- see screenshot for solution
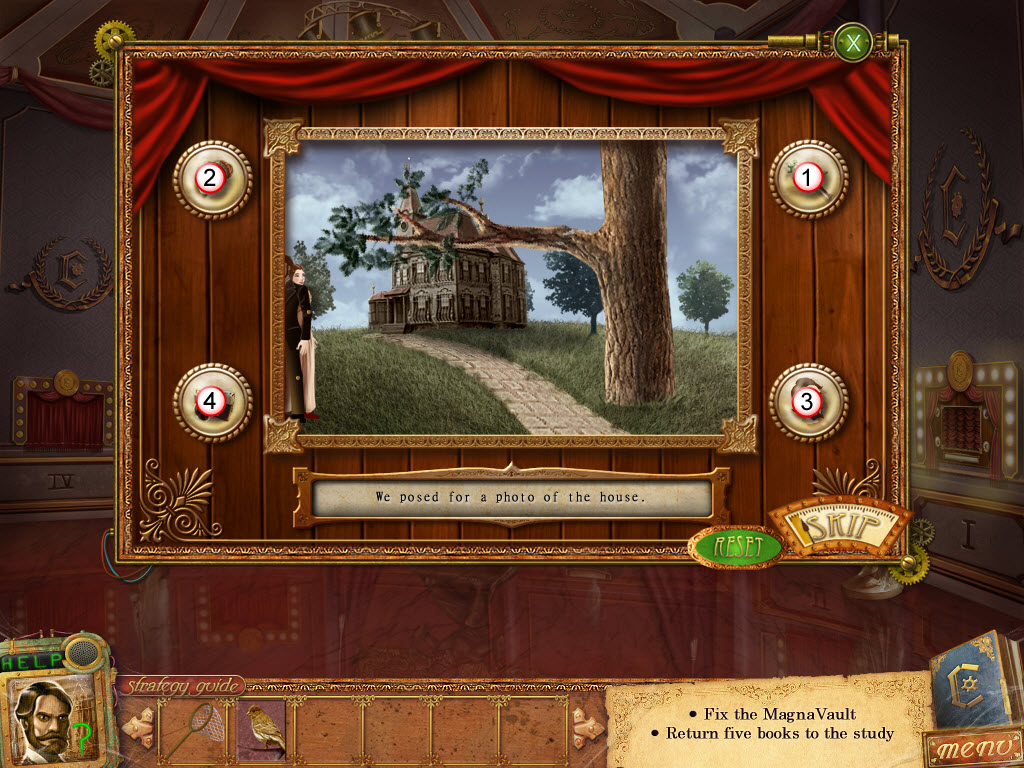
- receive the Planetarium Key
- return to the clockwork floor
- use the Planetarium Key on the left door
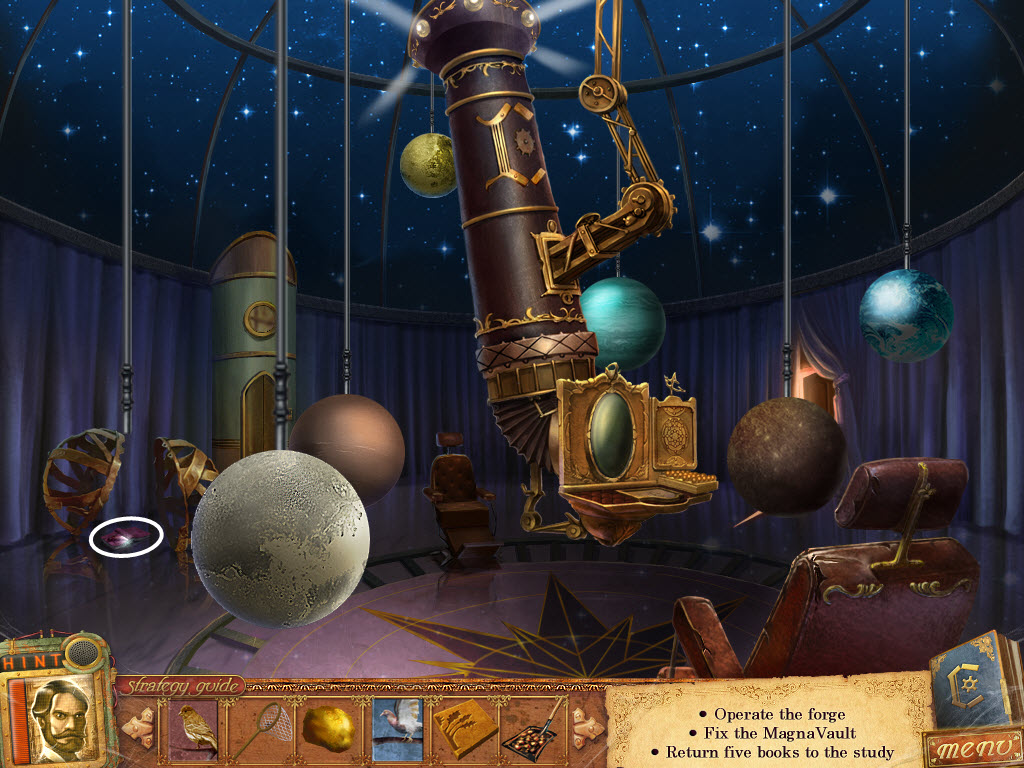
- enter the planetarium
- pick up the Journal Entry

- pull back the curtain
- enter the forge
- pick up the seven Gold Nuggets
- pick up the Bird Book
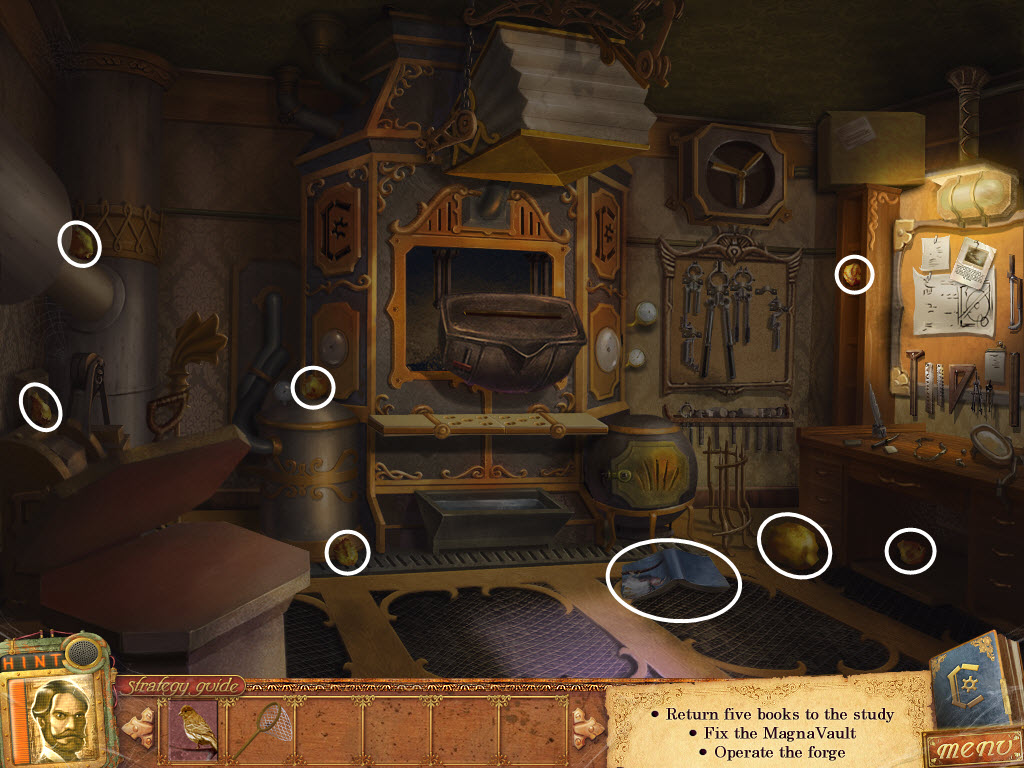
- knock down the box in the upper-right corner
- click the sparkles - hidden object scene
- find the Coal Shovel
- return to the study
- click the sparkles - hidden object scene
- find the Painting Scrap
- go into the bedroom
- examine the painting
- Painting Puzzle
- replace the Painting Scrap
- move the rows/columns up/down to slide them
- recreate the picture
- see video for solution
- receive Elevator Button Half
- return to the study
- use the Coal Shovel on the fireplace
- receive Shovel with Embers
- return to the planetarium
- pick up the Bird Book
- return to the dining room
- pick up the Magnavault Button
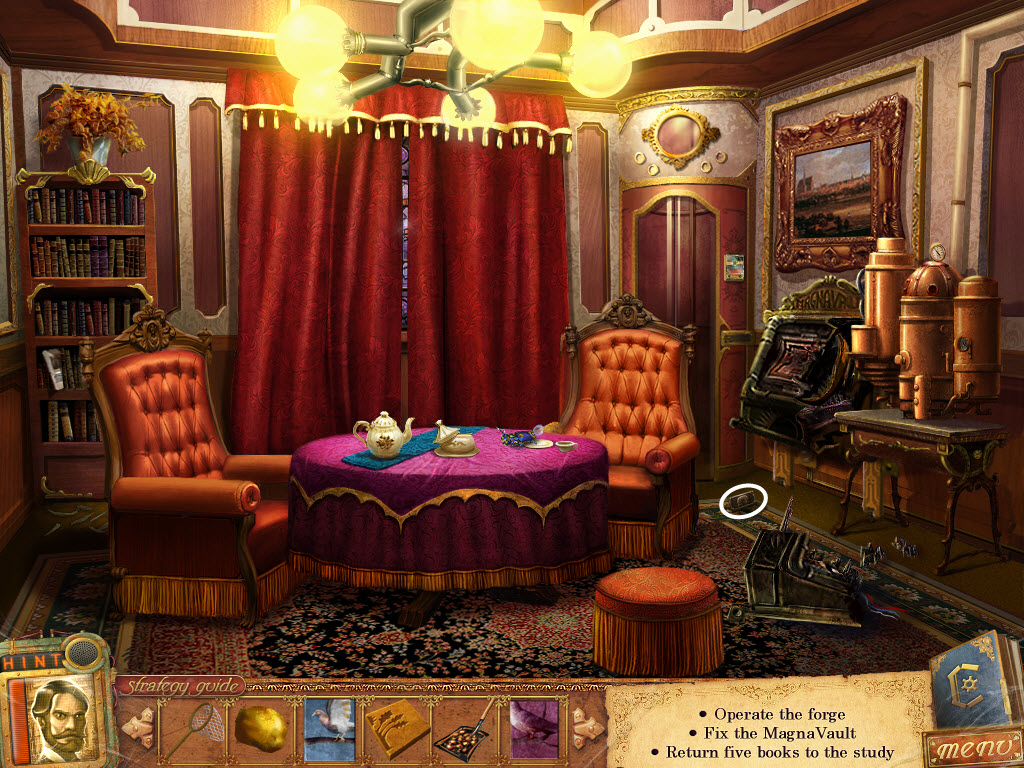
- pull back the curtain
- examine the stained glass window
- Stained Glass Window Puzzle
- click the nodes in the middle to move four tiles at a time
- recreate the picture
- see video for solution
- receive Pliers
- return to the bedroom
- use the Pliers to remove the Spring from the bed
- examine the magnavault
- Magnavault Puzzle
- replace the Magnavault Button
- use the buttons to move the colored balls into their match spots
- see video for solution
- take the Bird Book
- return to the planetarium
- examine the projector
- Telescope Puzzle
- replace the Spring
- arrange the planets in the order you see them
- larger planets are placed near the middle (bottom hole)
- medium sized planets are placed between the bottom and top holes
- smaller sized planets are place along the top
- see video for solution
- return to the forge
- take the Journal Entry off the board
- use the Shovel with Embers on the forge
- place the Gold Nuggets int he machine on the left to flatten it
- place the Gold Sheet in the bucket
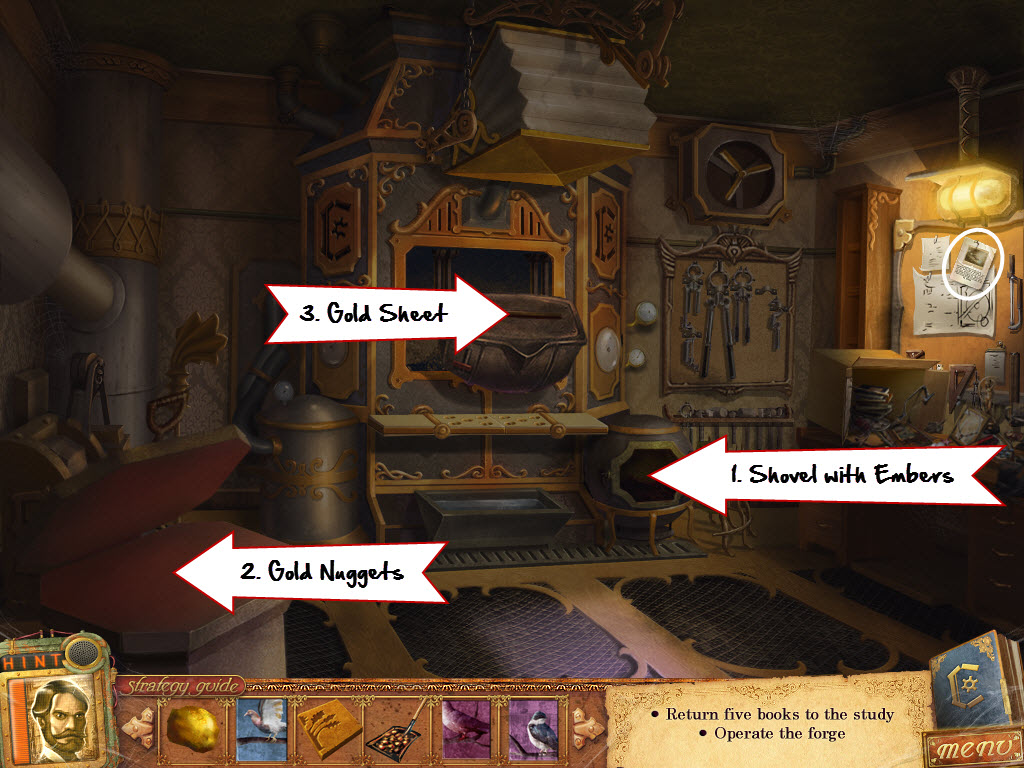
- look inside the mold
- Mold Puzzle
- match the mold halves
- receive the Book Box Key
- return to the study
- examine the box on the table
- place the Book Box Key in the box
- take the Bird Book
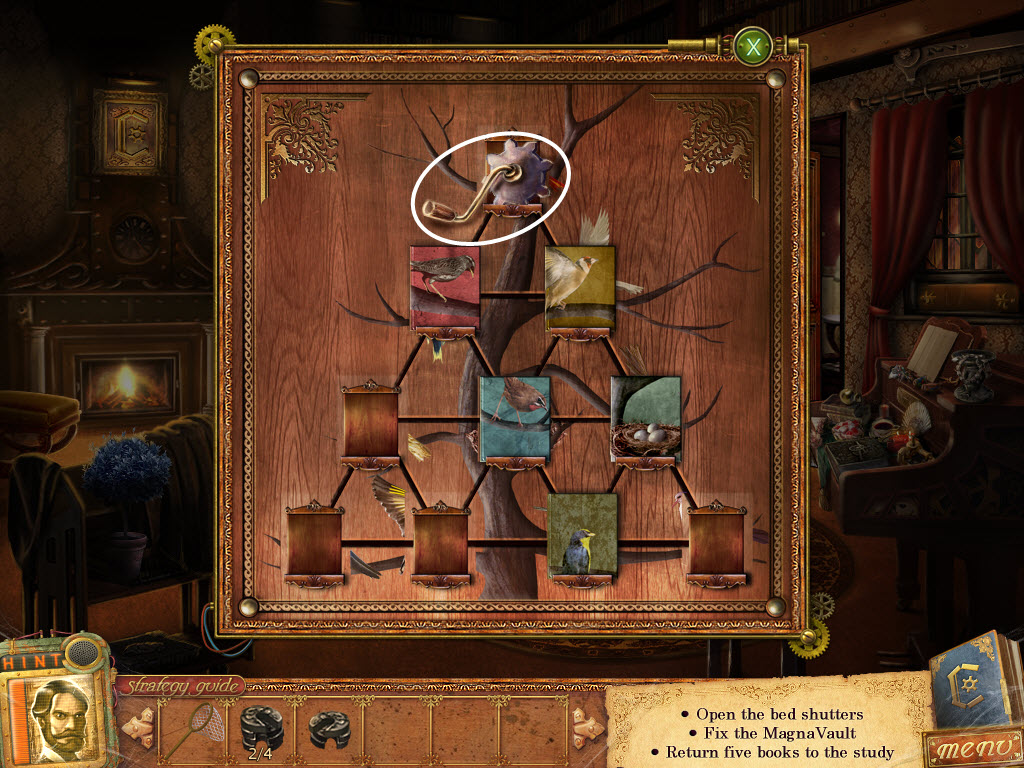
- examine the book shelf
- Bird Book Puzzle
- replace the five Bird Books
- click the triangular areas between the books to rotate them
- complete the picture
- see video for solution
- enter the mail room
- Mail Room Puzzle
- quickly click on all the falling items
- keep clicking on them so they don't fall to the ground
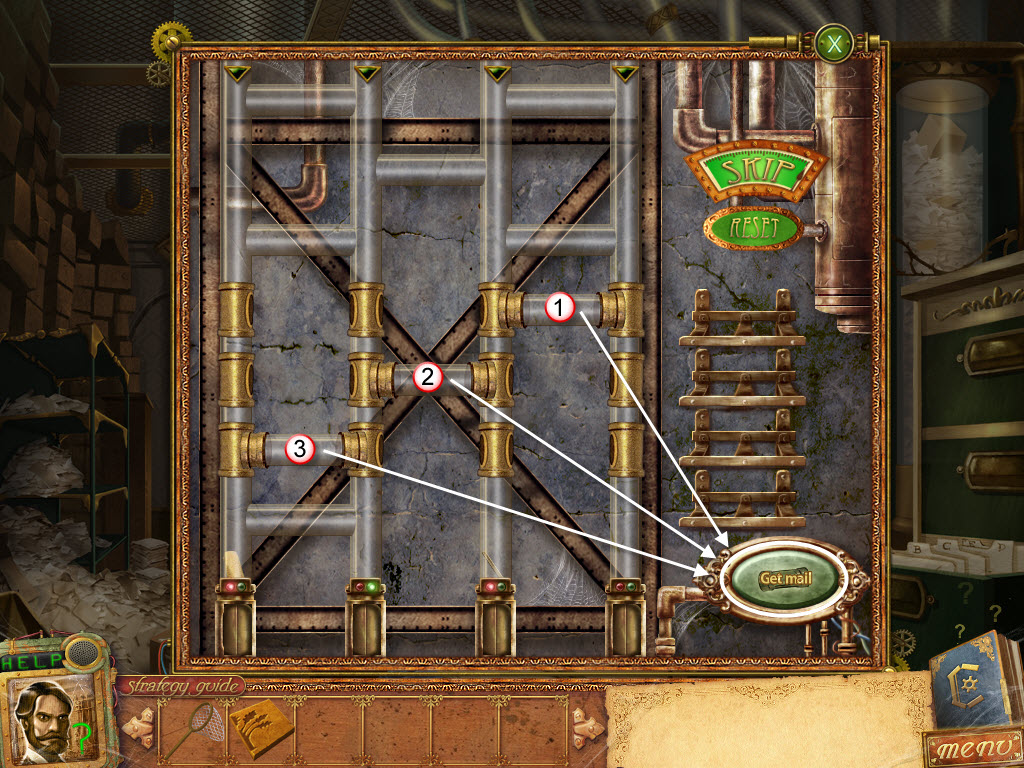
- examine the mail tubes
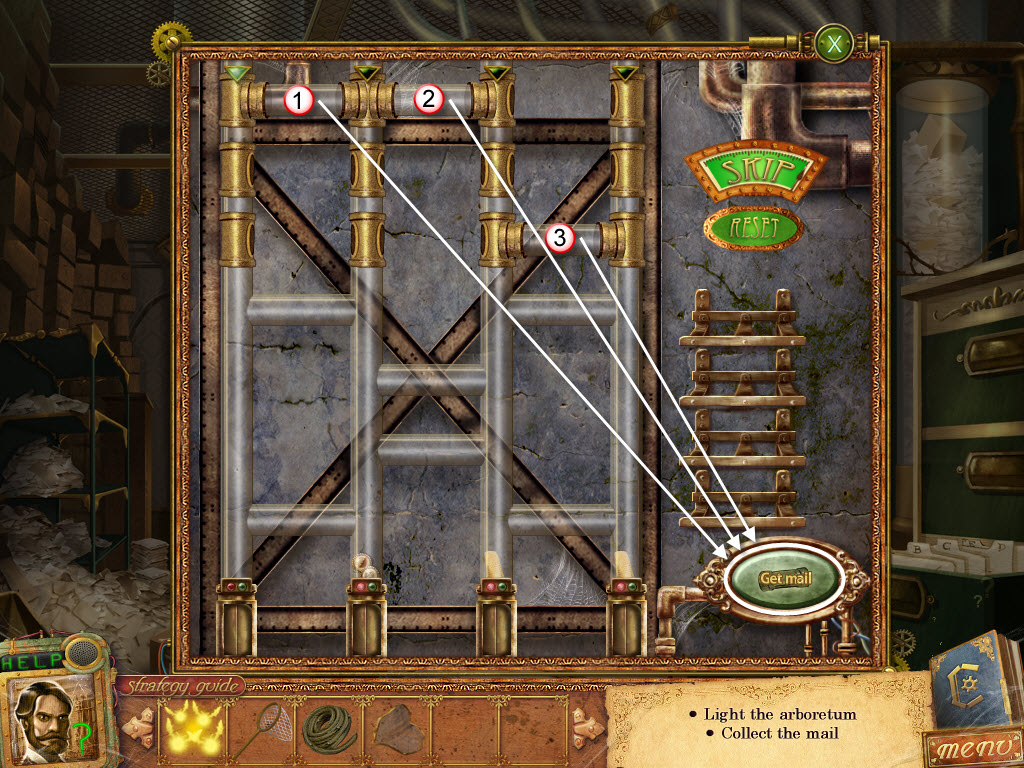
- Mail Tube Puzzle
- place the three tubes on the machine so the mail coming in is rerouted to pick up the mail in the various tubes
- place one tube and then click "get mail" when you are finished
- place the next tube and click "get mail" and so on until you've used all three tubes
- see screenshot for solution
- receive Crowbar and Elevator Button Half
- use the Crowbar on the crate
- return to the study, bedroom and luxury floor and use the Butterfly Net to catch the Fireflies
- return to the elevator platform
- replace the Elevator Button Halves
- press the button to go to the nature floor
- pick up the Journal Entry
- click on the firefly
- click the sparkles - hidden object scene
- find the Patch
- return to the forge
- use the Patch on the bellows
- look inside the mold
- take the Robot Shears
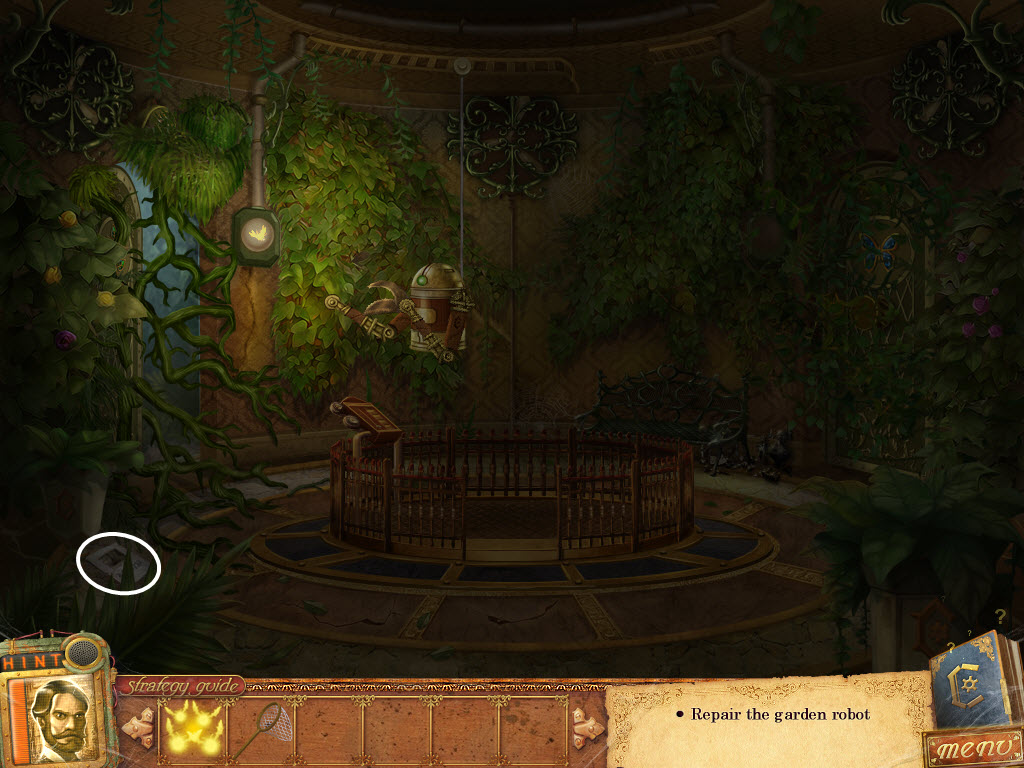
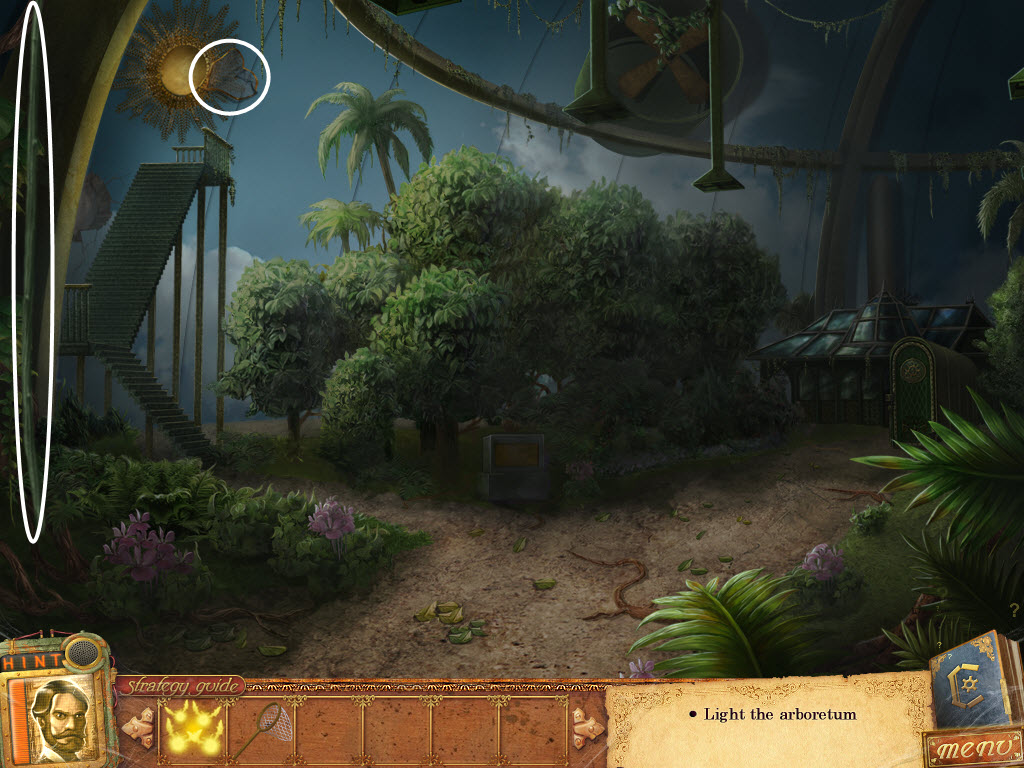
- return to the nature floor
- click the firefly
- examine the gardening robot
- replace the Robot Shears
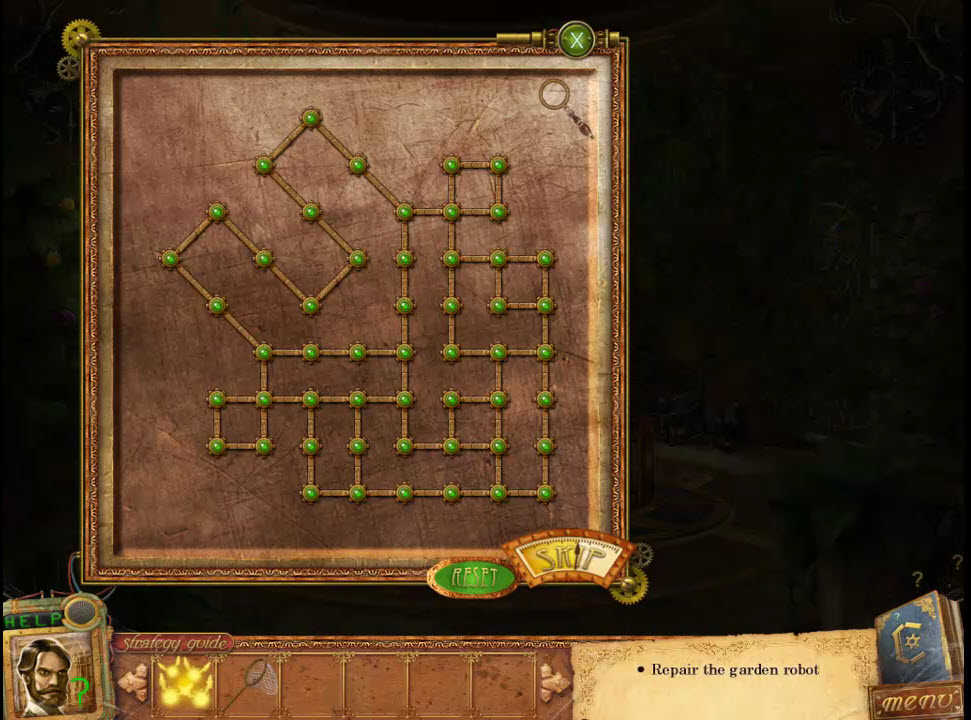
- Gardening Robot Puzzle
- rotate the pieces so they are all connect to each other
- see screenshot for solution
- go into the arboretum
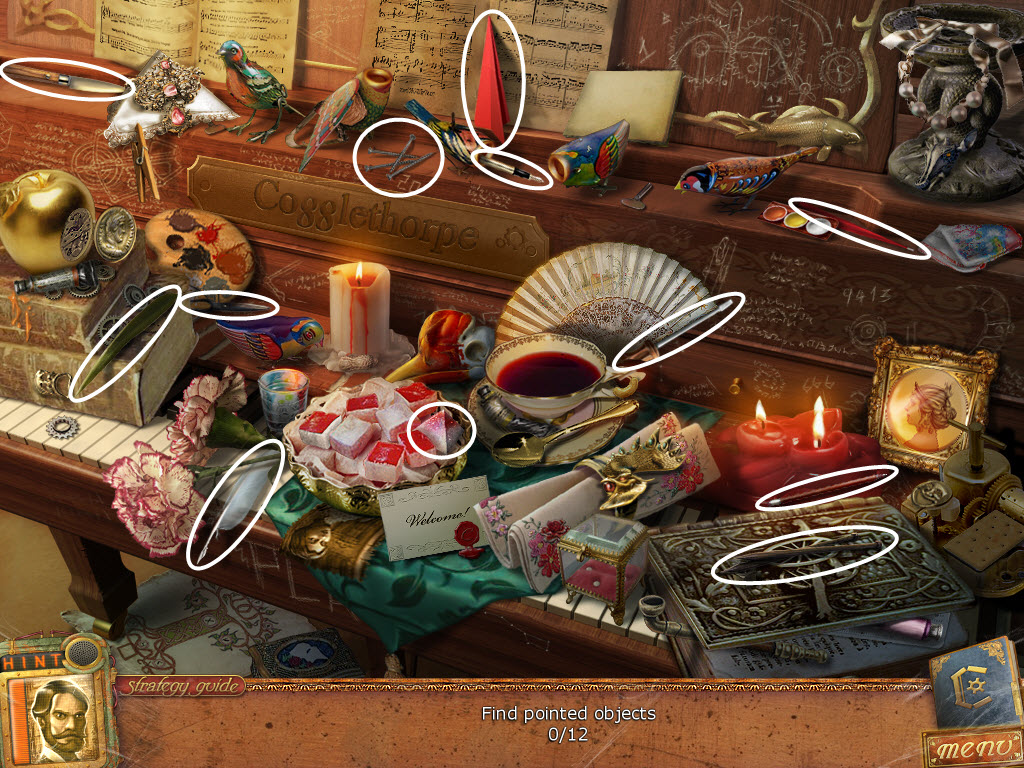
- examine the eclectic box
- Electric Box Puzzle
- spell out the word Cogglethorpe
- click the letters by following the lights
- see video for solution
- take the Bent Sun Dome Lid
- take the Vine
- examine the hole in the wall
- remove the three branches
- return to the mail room
- examine the mail tubes
- Mail Tube Puzzle
- place the three tubes on the machine so the mail coming in is rerouted to pick up the mail in the various tubes
- place one tube and then click "get mail" when you are finished
- place the next tube and click "get mail" and so on until you've used all three tubes
- see screenshot for solution
- receive Theater Buttons
- return to the gallery
- examine clockwork theater III
- Clockwork Theater III Puzzle
- replace the Theater Buttons
- press the buttons in the correct order to fix the pipe
- see screenshot for solution
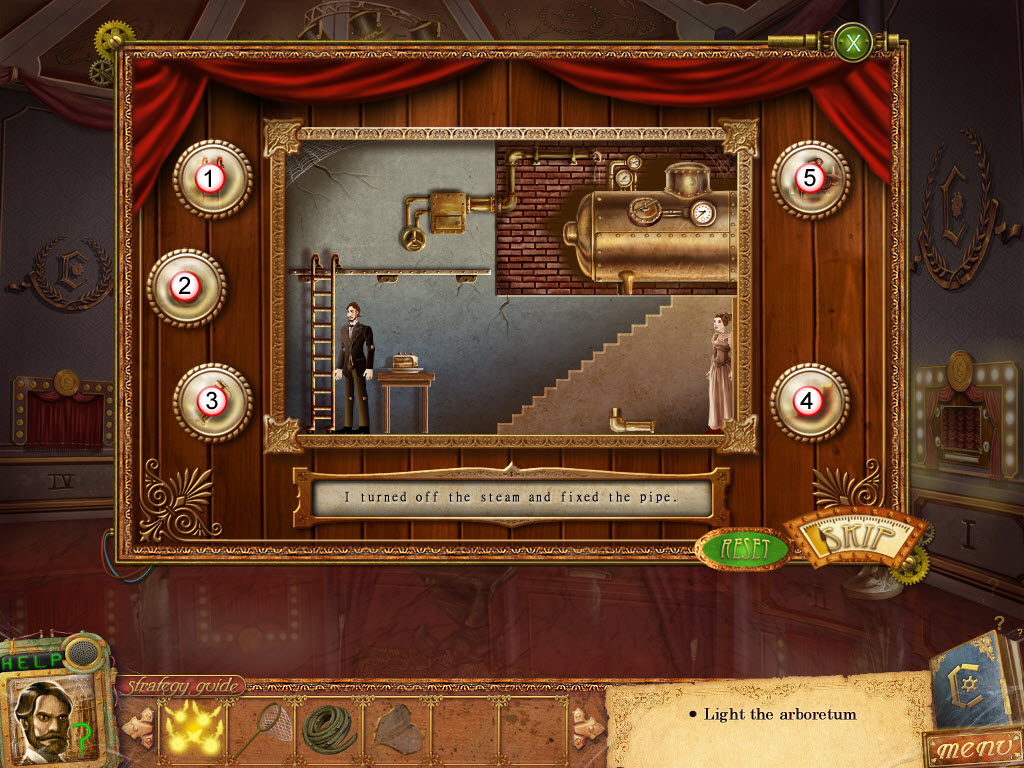
- receive the Clockwork Zoo Key
- return to the forge
- use the Bent Sun Dome Lid on the machine on the left to flatten it
- click the sparkles - hidden object scene
- find the Rail Tracks
- return to the nature floor
- replace the Rail Tracks along the ceiling
- click the firefly so it's on the right - if it isn't already
- examine the door
- place the Clockwork Zoo Key in the door
- go into the clockwork zoo
- pick up the Journal Entry
- pick up Armadillo Tail

- place the Armadillo Tail on the armadillo
- look inside the armadillo
- Armadillo Puzzle
- move the bolts to untangle the wires
- see video for solution
- receive Monkey Arm
- place the Monkey Arm on the monkey
- look inside the monkey
- Monkey Puzzle
- you need to connect wires to each node
- each node can only have as many wires connected to it as the number on the node
- see video for solution
- receive Iguana Neck Piece
- place the Iguana Neck Piece on the iguana
- look inside the iguana
- Iguana Puzzle
- move the bolts to untangle the wires
- see video for solution
- receive Eagles Talons
- use the Eagles Talons on the eagle
- look inside
- Eagle Puzzle
- you need to connect wires to each node
- each node can only have as many wires connected to it as the number on the node
- see video for solution
- take the Hexagonal Key
- return to the arboretum
- replace the Sun Dome Lid on the sun
- place the Fireflies inside the sun
- examine the greenhouse
- Greenhouse Lock Puzzle
- use the Hexagonal Key on the lock
- push the buttons in the correct order to light them all green
- see video for solution
- enter the greenhouse
- pick up the Colored Spheres
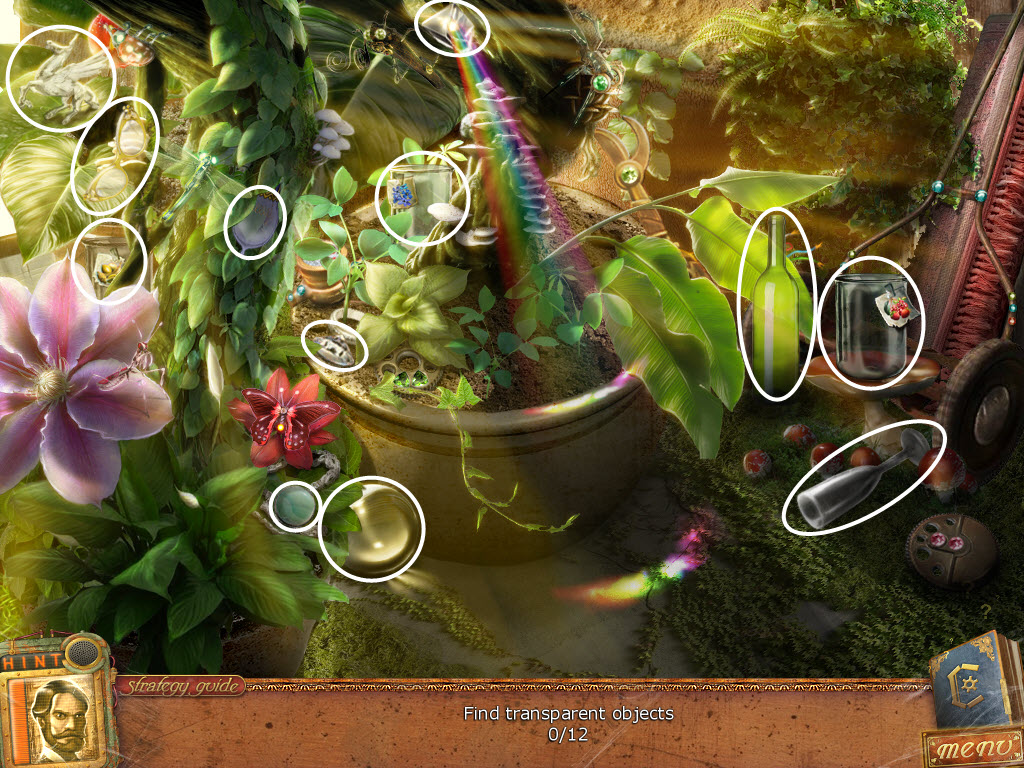
- click the sparkles - hidden object scene
- find the Beakers
- examine the chemistry set
- pick up the Journal Entry and the Plant Sample Kit
- replace the Beakers
- return to the clockwork zoo
- examine the magnavault
- Magnavault Puzzle
- replace the Colored Spheres
- use the buttons to move the colored balls into their match spots
- see video for solution
- take the Elevator Button Half
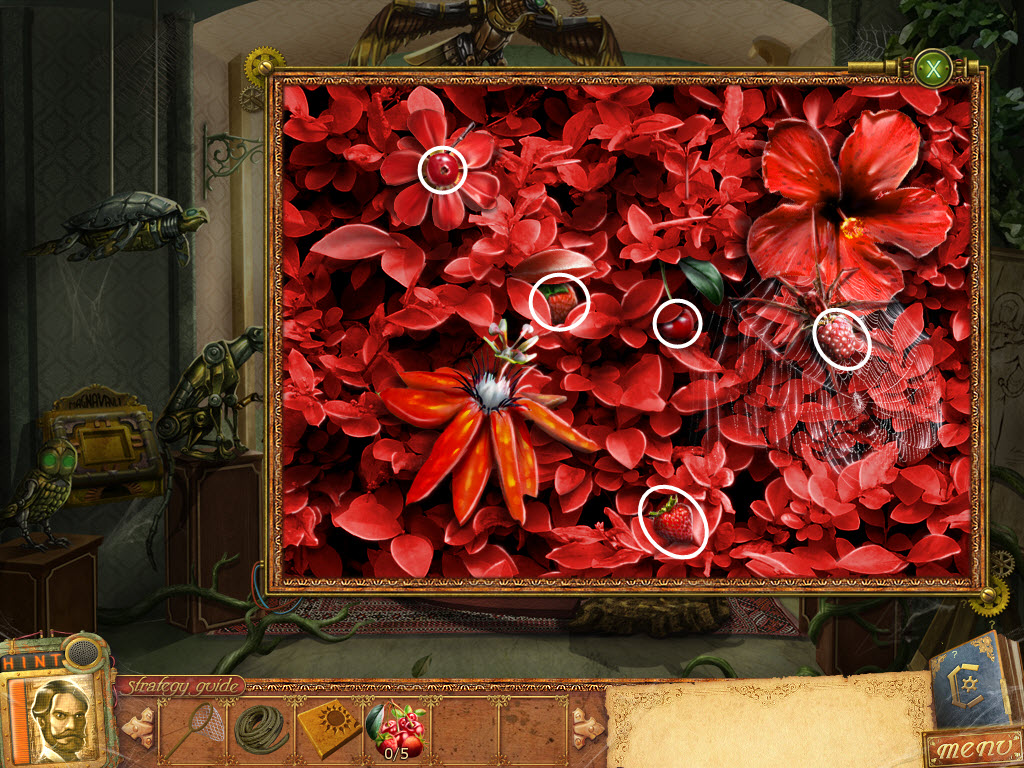
- examine the red berries (plant) - find the red berries
- return to the study
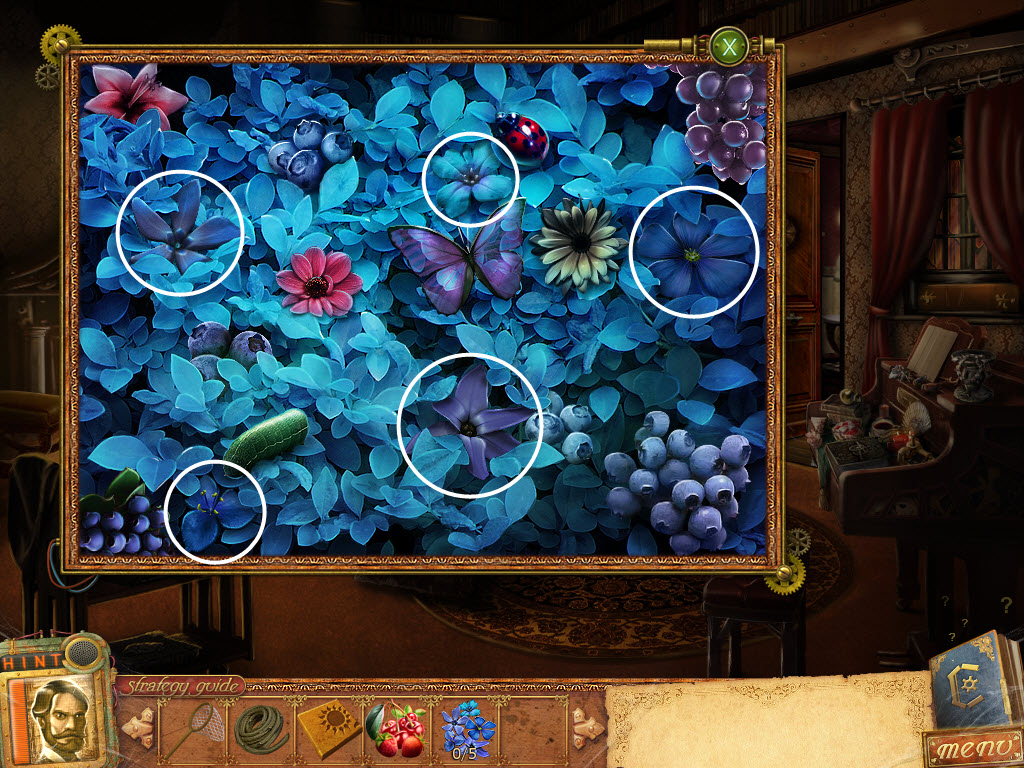
- examine the blue flowers - find the blue flowers
- return to the dining room
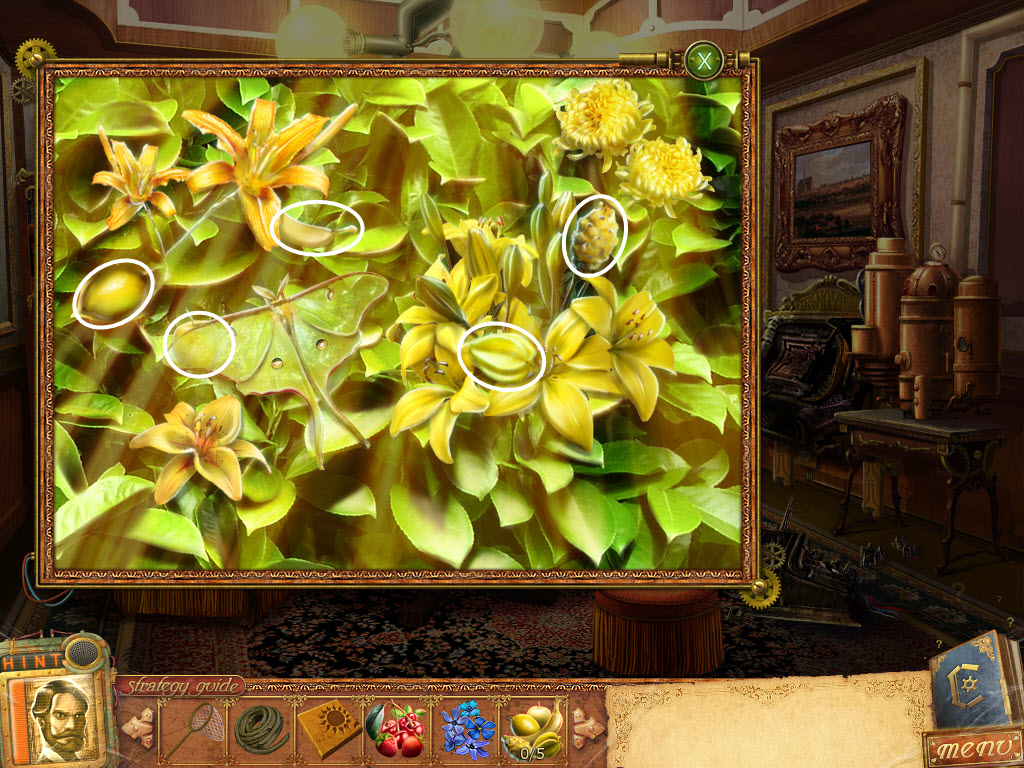
- examine the yellow fruit (plant) - find the yellow fruit
- return to the greenhouse
- examine the chemistry set
- replace the Beakers - if you haven't already done so
- place the Red Berries, Blue Flowers, and Yellow Fruit in the matching Beakers
- take the Nutrient Chemical
- examine the nutrient distribution system
- Nutrient Distribution System Puzzle
- pour the Nutrient Chemical into the funnel on the left
- turn the knobs on/off to distribute the chemical to each beaker until they all reach 3
- this is just like the oil puzzle you played earlier in the game
- see video for solution
- pick up the Theater Doll
- return to the gallery
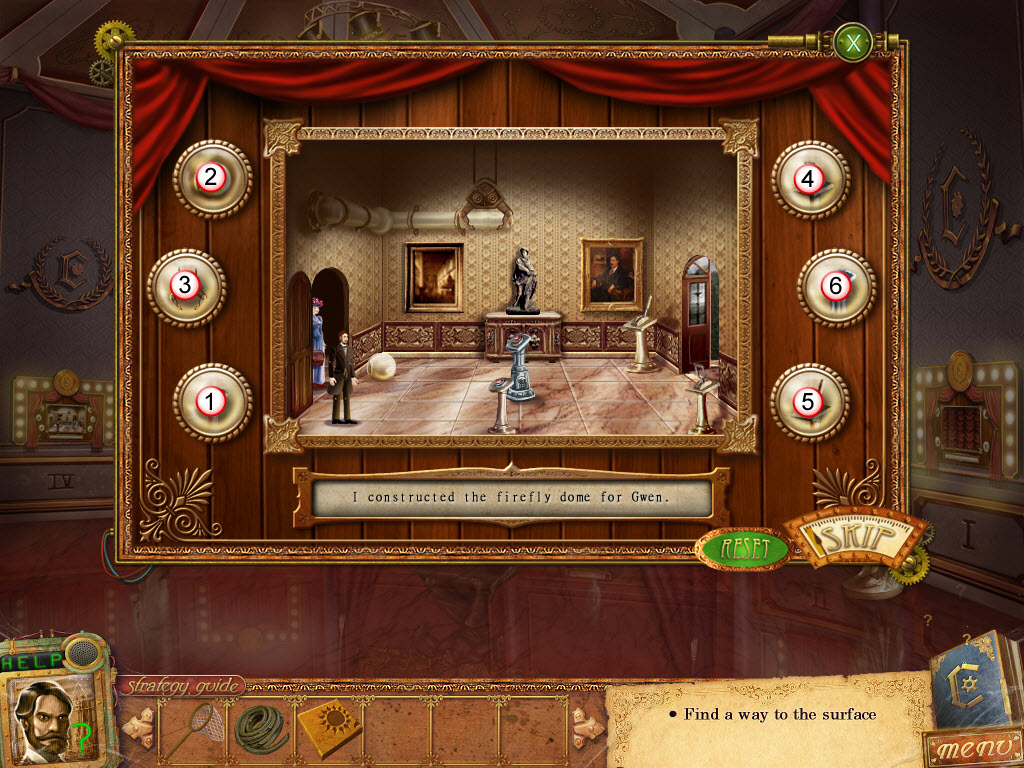
- examine clockwork theater IV
- Clockwork Theater IV Puzzle
- replace the Theater Doll
- press the buttons in the correct order to construct the firefly dome
- see screenshot for solution
- take the Elevator Button Half
- return to the elevator platform
- replace the Elevator Button Halves
- go to the surface floor
- use the Butterfly Net to catch the Fireflies
- examine the wardrobe
- Key Puzzle
- press the triangular areas to rotate the keys until they are in numerical order
- see video for solution
- take the Lock Ring
- pick up the Journal Entry
- examine the door
- Surface Floor Door Puzzle
- replace the Lock Ring
- rotate the rings so the pins can reach the center
- some rings will rotate other rings with it
- see video for solution
- go into Cogglethorpe's lair
- use the Butterfly Net to catch the Fireflies
- place the Fireflies in the dome on the floor
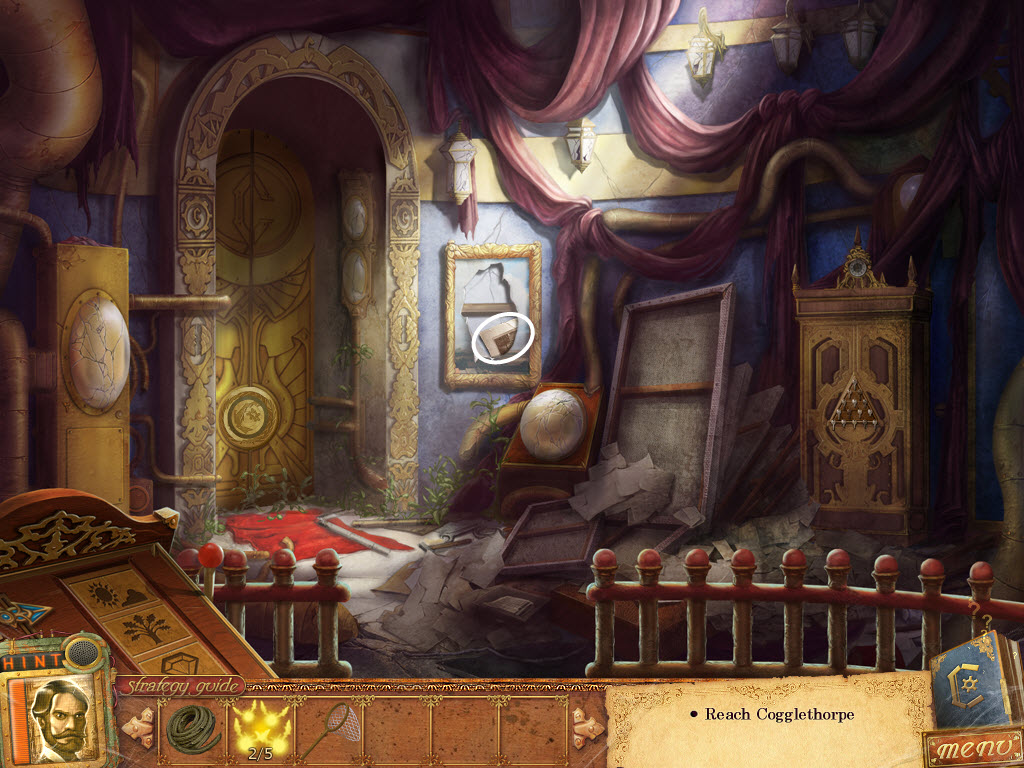
- click the sparkles - hidden object scene
- find the Pneumatic Key Tube
- return to the nature floor
- use the Vine on the hook - where the portal controls used to be
- go down to the luxury floor
- go into the dining room
- use the Pneumatic Key Tube on the tube
- go down to the spare parts
- pick up the Tar Bucket
- return to the clockwork floor
- examine the clock
- Clock Puzzle
- rotate the pieces so they are all connect to each other
- see screenshot for solution
- receive the Screwdriver
- return to the nature floor - use can once again use the portal controls
- click the sparkles - hidden object scene
- find the Blowtorch
- return to the greenhouse
- examine the robot
- use the Tar Bucket on the holes
- use the Blowtorch on the crack
- use the Screwdriver on the screws
- return to Cogglethorpe's lair
- examine the red box by the left staircase
- Red Box Puzzle
- you need to connect wires to each node
- each node can only have as many wires connected to it as the number on the node
- see video for solution
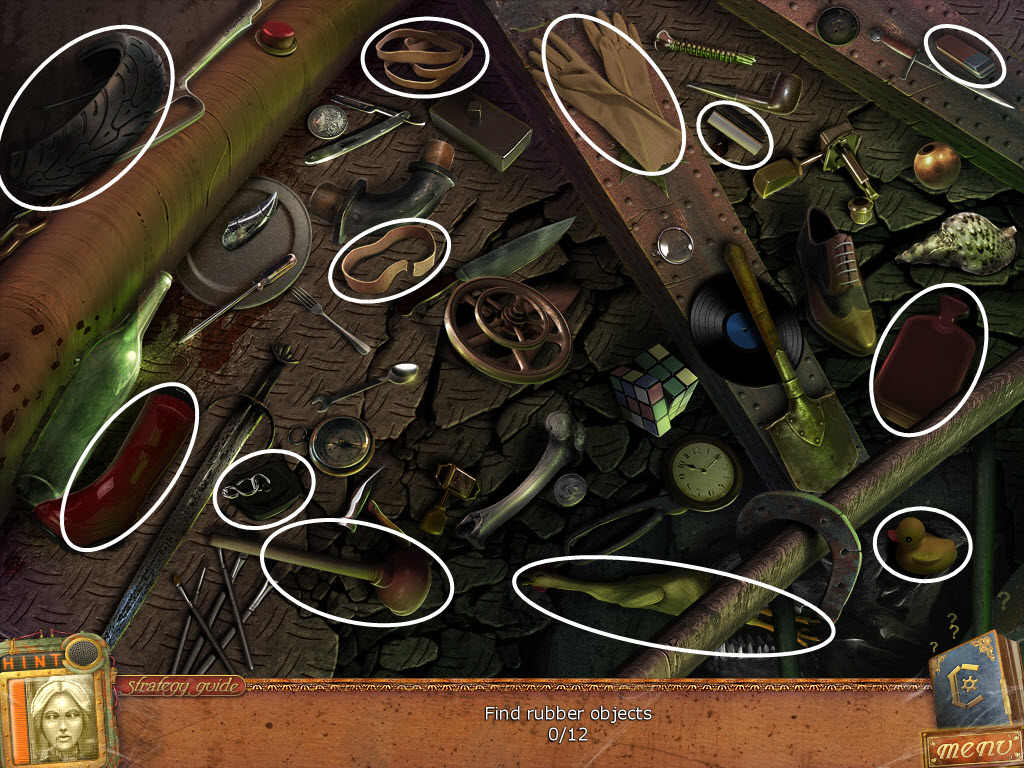
- click the sparkles - hidden object scene
- find the Rubber Gloves
- use the Rubber Gloves on the red box by the right staircase
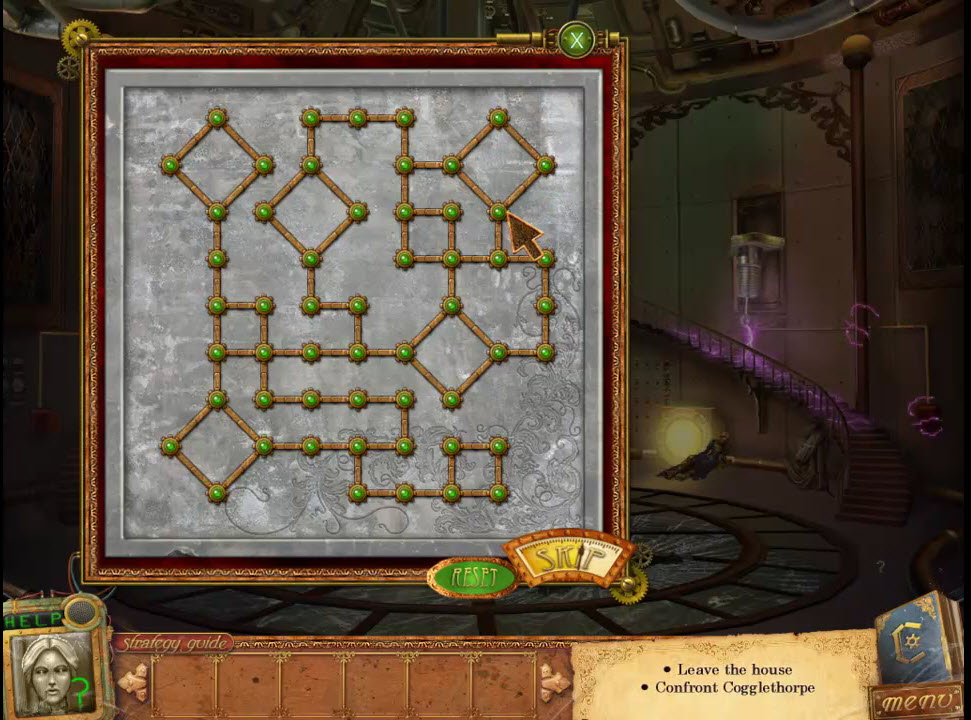
- Red Box Puzzle 2
- rotate the pieces so they are all connect to each other
- see screenshot for solution
- pick up the Electrical Coil
- use the Electrical Coil on the claws
The End!